 |
|
 06-13-2017, 01:08 PM
|
#1
|
|
Member
Join Date: Jun 2017
Location: California
Posts: 12
|
 1999 towlite hi lo wall repair
Aloha everyone!
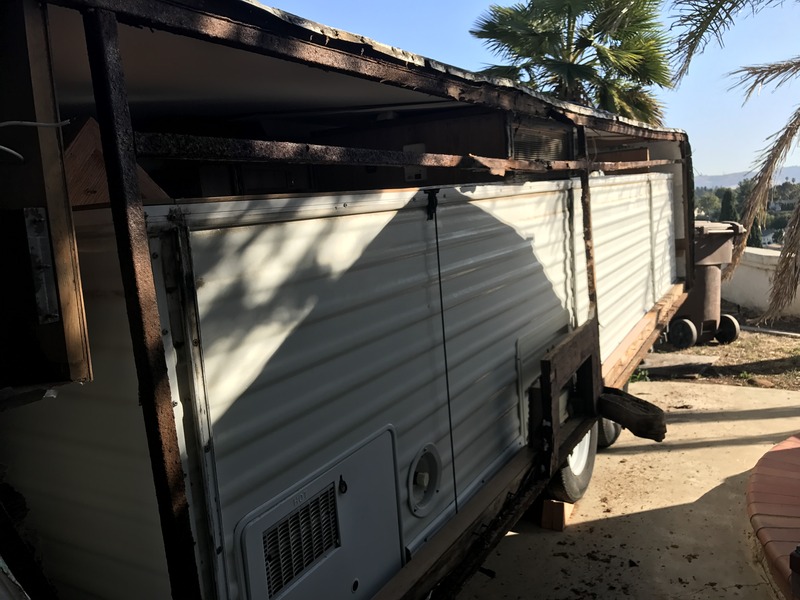
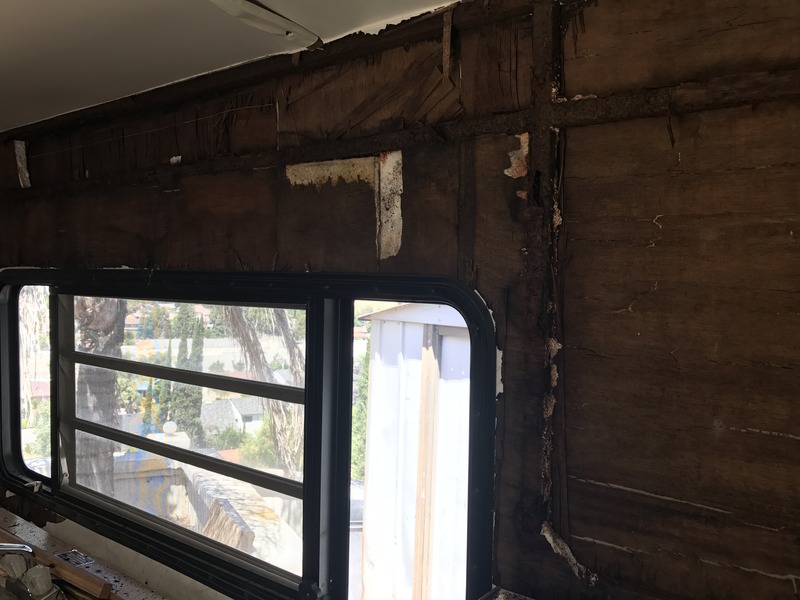
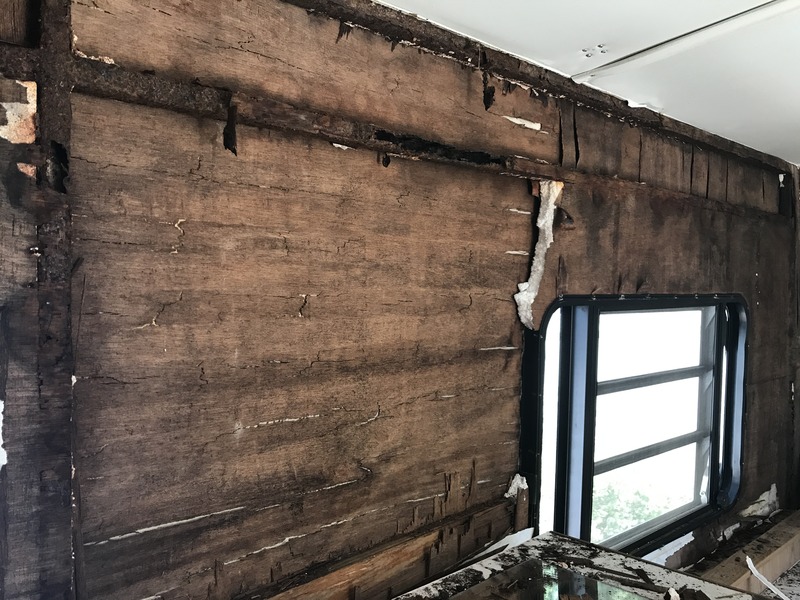
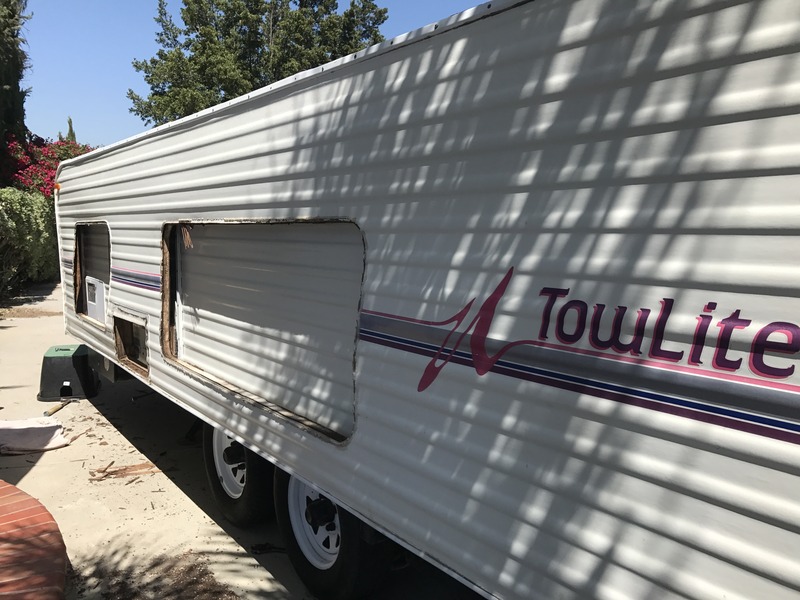
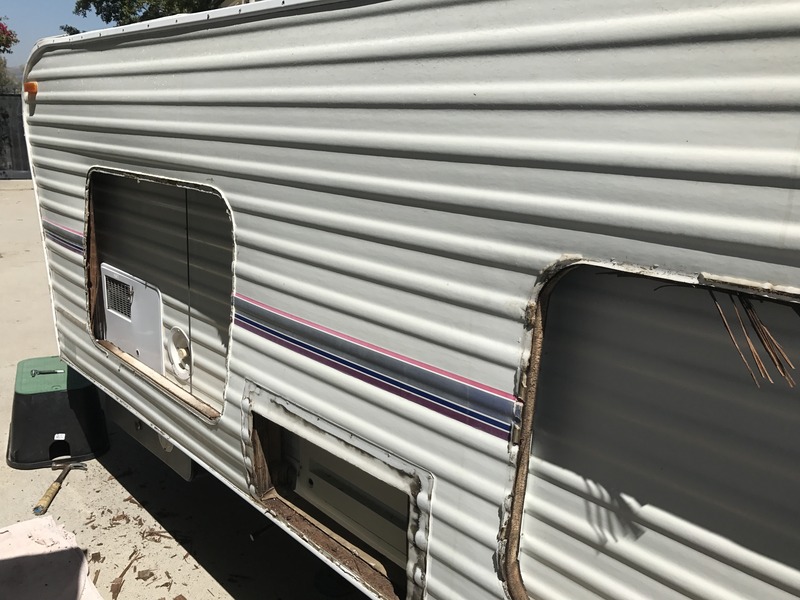
New to this forum  been reading up on many posts and found so much help Thanks! I was hoping to find some info on wall repair for my 99 towlight 21ft if anyone could point me in the right direction. The wall is completely rotted. Even some of the steel tubing is rusted and corroded. The layers from the inside out are wood panel, styrofoam, wood panel, then fiberglass with steel tubing as the frame. I need to replace the whole side of that wall and just wanted some guidance because I have dealt more with wood reconstruction...not so much steel. Fiberglass is the only thing that is still intact along with some steel tubing that did not get totally eaten by the rust. Thanks to anyone that can help with this process
|

|

|
|
06-13-2017, 02:49 PM
|
#2
|
|
Member
Join Date: Jun 2016
Location: Seattle, WA
Posts: 6
|
Hi,
I'm on the same path for my 84 Sun Chaser. Check out and search on this sidte for rebuild.
|
|
|
|
|
06-13-2017, 08:42 PM
|
#3
|
|
Senior Member
Join Date: Mar 2010
Location: Niagara Falls,NY
Posts: 4,069
|
Wall repair
Consider brasing on the inside to support the walls. Steel tubing would have to be welded or scab in a new piece of metal tubing. Use liquid nails heavy duty to put your wall layers back together just as you have described. Rusty tubing should be painted with rustoleum paint. Do a search on the forum for other towlite repairs. Welcome to the forum. You must take out all your windows and reseal. You tube has a video on how to do this. This could be the source of your water intrusion. Lexel caulk and butyl tape are used in the window resealing. Good luck with your repairs. Post pictures so we can help you.
|
|
|
|
|
06-14-2017, 01:21 PM
|
#4
|
|
Member
Join Date: Jun 2017
Location: California
Posts: 12
|
Thanks for the tips When rebuilding, would you use styrophome for insulation or is the fiberglass insulation that is used in houses okay? The styrophone seams to make the wall a little bit more sturdy but the fiberglass is more easy to manipulate.
|
|
|
|
|
06-14-2017, 03:51 PM
|
#5
|
|
Senior Member
Join Date: Jun 2016
Location: Ruston, LA
Posts: 273
|
I've been doing that myself on a different thread
http://www.hilotrailerforum.com/f35/...-rebuild-5496/
That gives you a little look at what one approach is at least.
__________________
--
2000 24' Classic, "We have the technology, we must rebuild it"
Also in the garage, some stuff to pull it:
1999 3/4 ton 'Burb
1993 Roadmaster wagon (well, it probably won't pull it)
|
|
|
|
|
06-14-2017, 08:30 PM
|
#6
|
|
Senior Member
Join Date: Mar 2010
Location: Niagara Falls,NY
Posts: 4,069
|
Insulation
Having rebuilt my Classic I would advise you to stick with the styrofoam sheets. Fiberglass will sag and be a mess if it gets wet. Use heavy duty liquid nails between your layers. Cheapest at Walmart. I coudn't get your pictures to show up. Could you make a photo bucket or some other free sit like that. Would love to help you more once I see some pictures.
|
|
|
|
|
06-14-2017, 09:01 PM
|
#7
|
|
Senior Member
Join Date: Oct 2016
Location: ohio
Posts: 454
|
yea I agree stick with the Styrofoam.
|
|
|
|
|
06-15-2017, 01:51 AM
|
#8
|
|
Member
Join Date: Jun 2017
Location: California
Posts: 12
|
|
|
|
|
|
06-15-2017, 02:48 PM
|
#9
|
|
Member
Join Date: Jun 2017
Location: California
Posts: 12
|
|
|
|
|
|
06-15-2017, 02:49 PM
|
#10
|
|
Member
Join Date: Jun 2017
Location: California
Posts: 12
|
|
|
|
|
|
06-15-2017, 02:50 PM
|
#11
|
|
Member
Join Date: Jun 2017
Location: California
Posts: 12
|
|
|
|
|
|
06-15-2017, 02:52 PM
|
#12
|
|
Member
Join Date: Jun 2017
Location: California
Posts: 12
|
|
|
|
|
|
06-15-2017, 02:53 PM
|
#13
|
|
Member
Join Date: Jun 2017
Location: California
Posts: 12
|
|
|
|
|
|
06-15-2017, 03:20 PM
|
#14
|
|
Senior Member
Join Date: Jun 2016
Location: Ruston, LA
Posts: 273
|
That looks like some of the same type damage I've been working through but a little more advanced on some of the rust-through on the beams.
The styrofoam wall adds a lot of rigidity and strength to the structure as it fills the spaces between metal beams. I'd recommend using extruded foam (pink or blue stuff) to replace the white. It won't retain water even if it gets wet again.
As for the beams, I added some supports along them in my own work (another 1by1" board screwed and bonded to the beam with something like liquid nails) to strengthen them in areas where they were rusted badly. That was after an initial cleanup with a wire brush to help the adhesion though.
That plus the new extruded foam will probably strengthen the wall nicely. The extruded foam has significantly higher strength properties than the white stuff anyway.
Just some thoughts. I think every one of these restoration projects is a little different though.
__________________
--
2000 24' Classic, "We have the technology, we must rebuild it"
Also in the garage, some stuff to pull it:
1999 3/4 ton 'Burb
1993 Roadmaster wagon (well, it probably won't pull it)
|
|
|
|
|
06-15-2017, 03:24 PM
|
#15
|
|
Senior Member
Join Date: Jun 2016
Location: Ruston, LA
Posts: 273
|
One more thought: that wall was damaged most likely by a leaking roof above it. Make sure you investigate that a bit as you work through things just in case you haven't identified the original source of the water yet.
Best
-Leland
__________________
--
2000 24' Classic, "We have the technology, we must rebuild it"
Also in the garage, some stuff to pull it:
1999 3/4 ton 'Burb
1993 Roadmaster wagon (well, it probably won't pull it)
|
|
|
|
|
06-15-2017, 04:31 PM
|
#16
|
|
Senior Member
Join Date: Oct 2016
Location: ohio
Posts: 454
|
wow that's a lot of water damage, but like ya say she can be fixed. plans sound good. yes I did the Styrofoam thing to my wall, and it adds lots of strength. lessens flexibility. sure it will be lookin good in no time. I put my paneling up w/o any insulation, then drilled holes and shot it inside the wall, with a plywood brace out side the wall, to keep it flat and from puffing out. on the outside. just me tho like ya said everyone does different things. some of mine work, and a lot of them don't. lol good luck!
|
|
|
|
|
06-16-2017, 11:13 AM
|
#17
|
|
Member
Join Date: Jun 2017
Location: California
Posts: 12
|
I'm so happy to be part of this forum! You guys have been an amazing help. Currently we are wire brushing the frame and then going to rustoleum it and add some beams to help brace it. The t beams in the middle are going to have to come out and we will be replacing them with some new steel tubing. There was just too much damage and they broke in half. We also have to add a new wood beam at the bottom of the frame because it's so warped.
Thanks for the tips about the styrofoam. We will do that pink or blue stuff
Now when it comes to the cables... the bolts that the cable are Looped around are welded to the frame. Any ideas on how to un weld them so to say? we need to brace another beam to the bottom and wanted to put a new bolt through both the new and old beam to hold the cable. Or any ideas on how to deal with this situation in general? The bolt is looking kinda rusted as well.
|
|
|
|
|
06-16-2017, 11:14 AM
|
#18
|
|
Member
Join Date: Jun 2017
Location: California
Posts: 12
|
|
|
|
|
|
06-16-2017, 11:19 AM
|
#19
|
|
Member
Join Date: Jun 2017
Location: California
Posts: 12
|
The water damage was pretty bad. The t on the inside of the frame was completely corroded and will need to come out. Pretty interesting how you shot the insulation in. Since you've done both methods would you say shooting in the insulation was as it as sturdy as the styrofoam boards?
|
|
|
|
|
06-16-2017, 12:36 PM
|
#20
|
|
Senior Member
Join Date: Apr 2017
Location: Rural Route, Gray County, S/W Kansas
Posts: 124
|
Nut Welded, Not Bolt
[QUOTE: Now when it comes to the cables... the bolts that the cable are Looped around are welded to the frame. Any ideas on how to un weld them so to say? we need to brace another beam to the bottom and wanted to put a new bolt through both the new and old beam to hold the cable. Or any ideas on how to deal with this situation in general? The bolt is looking kinda rusted as well.]
It's the Nut that's Welded, NOT the Bolt. You may need some Penetrating Fluid on the Nut and Bolt Threads to be able to loosen & remove the bolt, but it can be done. Then, possibly a Tap to renew the threads on the Nut, with a new Bolt.
__________________
|
|
|
|
|
|
 Posting Rules
|
You may not post new threads
You may not post replies
You may not post attachments
You may not edit your posts
HTML code is Off
|
|
|
|
 » Recent Threads
 |
|
|
|
|
|
|
|
|
|
|
|
|
|
|
|
|
|
|
|
|
|
|
|
|
|
|
|
|
|
|
|
|
|
|
|
|
|


 Linear Mode

