 |
|
 12-24-2017, 10:27 PM
|
#121
|
|
Senior Member
Join Date: Mar 2010
Location: Niagara Falls,NY
Posts: 4,064
|
 Outstanding job
First I reviewed your flicker pictures. You have taken on a job that many would not even consider. You have taken this wreck to a beautiful usable state. I wish you many happy camping adventures.
__________________
|

|

|
|
05-21-2018, 03:46 PM
|
#122
|
|
Senior Member
Join Date: Jun 2016
Location: Ruston, LA
Posts: 272
|
Hi Everyone, it's been awhile since any major upgrades to the trailer, but I did a couple of things I thought I'd add to the thread.
First - a quick fix to keep the battery and pump door in-place. Over the years I think the tolerance of all of those little latches got too big and the sliding door didn't want to stay shut. A trip to Lowes found this gate latch that is spring to always be "closed" unless you pull on it:
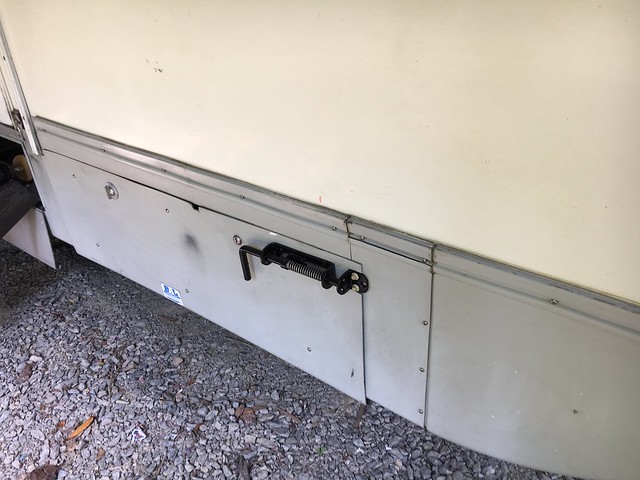 Updates Updates by Lineswest, on Flickr
and I got the stripes removed on one side too. It looks pretty good without the old faded pastel colors. I'm considering adding a little bit of the white reflective tape to the sides.
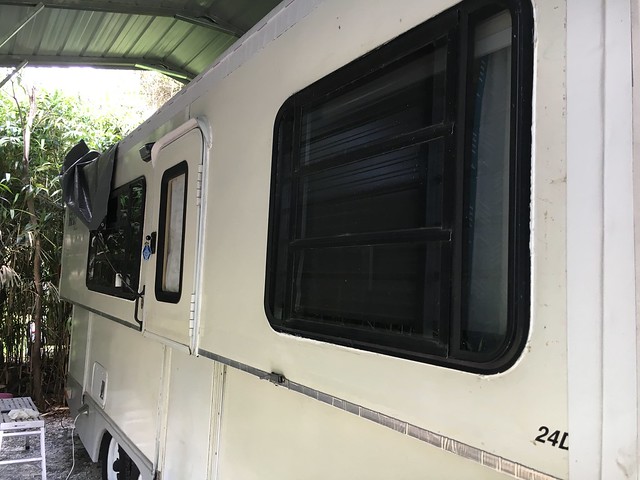 Updates Updates by Lineswest, on Flickr
__________________
--
2000 24' Classic, "We have the technology, we must rebuild it"
Also in the garage, some stuff to pull it:
1999 3/4 ton 'Burb
1993 Roadmaster wagon (well, it probably won't pull it)
|
|
|
|
|
05-21-2018, 09:02 PM
|
#123
|
|
Senior Member
Join Date: Mar 2010
Location: Niagara Falls,NY
Posts: 4,064
|
Love your upgrades.
The latch is the perfect answer to secure the cubby. Many a HiLo owner would be crusing down the highway and would see the battery tray slid out because the battery is fairly heavy.
|
|
|
|
|
06-18-2018, 01:24 PM
|
#124
|
|
Senior Member
Join Date: Jun 2016
Location: Ruston, LA
Posts: 272
|
Hi Everyone - time for a final post of pictures to the thread (pics also attached for permanency). There are a few odds and ends left, but I'm going to claim victory...
This weekend the trailer and I took a bold and courageous trip to Sams Club and back (about 80 miles) to check out all of the running gear work I had done to it over the last few weeks. It seemed wise to do that before heading out somewhere to actually camp and encountering tow problems on the way. This was some of the last rebuild work that needed checking and included new rubber shoes - even the spare which appeared to be original - and wheel bearing repacks. Everything ran smooth and cool.
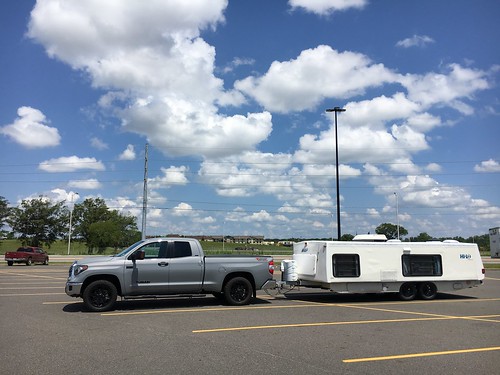 Untitled Untitled by Lineswest, on Flickr
Compared to:
 IMGP2989 IMGP2989 by Lineswest, on Flickr
I think the lack of stripes is growing on me. I had originally intended to put new stripping back on that wasn't damaged and faded, but the white/grey/black and Blue HiLo lettering doesn't look too bad. Catch you all in a different thread, and thanks for all the help and encouragement on the way.
__________________
--
2000 24' Classic, "We have the technology, we must rebuild it"
Also in the garage, some stuff to pull it:
1999 3/4 ton 'Burb
1993 Roadmaster wagon (well, it probably won't pull it)
|
|
|
|
|
01-04-2019, 09:57 AM
|
#125
|
|
Member
Join Date: Mar 2018
Location: Illinois
Posts: 39
|
I am doing a similar rebuild on my 2000 22' Towlite. I like what you did & your photos have helped a lot ! Question 1: Did the garage door seals on the lower edge of the top half work out ? They look like a good idea. Question 2: What material did you use to wrap the repaired beam on the lower edge of the top half ? I am looking at either an Aluminum or PVC Gutter section.
Thanks
|
|
|
|
|
01-04-2019, 10:54 AM
|
#126
|
|
Senior Member
Join Date: Jun 2016
Location: Ruston, LA
Posts: 272
|
Howdy - so far so good on the garage seal “slider.” But, since I’ve done it I’ve had a different idea that I applied around the front and back areas that could also work. You can see it here:
https://flic.kr/p/26StyQM
If you look below the gray mounding above the bumper cover, I’ve applied a D channel foam seal. When the trailer is down, the top slides over it and seals on it. I think it would be possible to seal all around the trailer like this, at least for the down position. I think it would be possible to position a second D channel on underneath the top moulding so that you get a seal in the up position too. Then you can eliminate the sliding seal all together. The question might be what to do around the wheel wells, but it could be worth thinking about.
I wrapped the repaired beam with the sticky/tar on one side, aluminum on the other side material that you can get at Lowes. It’s called Peel and Seal. My local Lowes had the silver color, but I covered the roof from material purchased online that was white. So far, no problems on either, and patching it is simple in case road debris or something else ever hits it.
Hope that helps!
__________________
--
2000 24' Classic, "We have the technology, we must rebuild it"
Also in the garage, some stuff to pull it:
1999 3/4 ton 'Burb
1993 Roadmaster wagon (well, it probably won't pull it)
|
|
|
|
|
03-23-2019, 07:39 PM
|
#127
|
|
Member
Join Date: Mar 2019
Location: Orlando, fl
Posts: 4
|
Wow! Thank you for starting with “one step at a time.” We’re on a time crunch and repairing the passenger side wall. The sliders have either broken or fallen off due to a poor repair job including screws through the fiberglass and a lack of protection on the bottom beam. We’ve taken all of that out and are cutting out the new wall panels now. Linguistic nails didn’t work too well on our bathroom wall and we don’t have any fancy clamps or equipment to hold it in place. Any tips?
We plan to replace the bottom beam with 2x4’s, the rubber tube sealant, and re attach the sliders but wondering if we need to carve out spots for them in the support beam or just attach where they need to be?
This is our first building project with three kids underfoot. (Help! ��)
|
|
|
|
|
03-24-2019, 03:36 PM
|
#128
|
|
Senior Member
Join Date: Jun 2016
Location: Ruston, LA
Posts: 272
|
Quote:
Originally Posted by Cninaz

Wow! Thank you for starting with one step at a time. Were on a time crunch and repairing the passenger side wall. The sliders have either broken or fallen off due to a poor repair job including screws through the fiberglass and a lack of protection on the bottom beam. Weve taken all of that out and are cutting out the new wall panels now. Linguistic nails didnt work too well on our bathroom wall and we dont have any fancy clamps or equipment to hold it in place. Any tips?
We plan to replace the bottom beam with 2x4s, the rubber tube sealant, and re attach the sliders but wondering if we need to carve out spots for them in the support beam or just attach where they need to be?
This is our first building project with three kids underfoot. (Help! ��)
|
Sounds like youre in the middle of it - and I remember being there more than once, thinking now what?!? I reminded myself more than once that I wasnt building a piano and it would be okay, hopefully that helps you too 
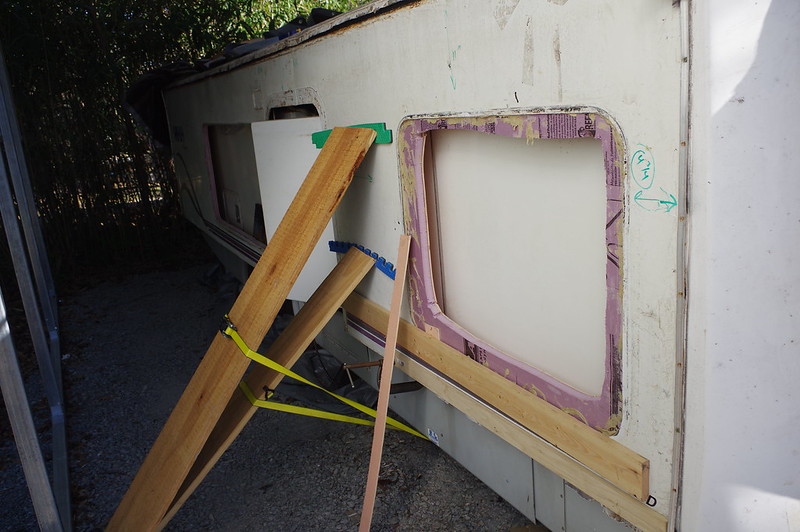
Lets start with the beam: your 2x4 plan seems like a good one. I used a 4x4 that I notched using a table saw so that it would fit along the steel beam on the lower side. I think theres a picture of that somewhere over on the flickr page. The 2x4s should work too. As long as the inner side of your new beam / wall combination is the same flush distance as the old wall, you shouldnt need to carve out a spot for the sliders. Getting access to the slider was hard for me because I didnt have them pre-installed on the beam, maybe you could try that to save yourself some troubles later?
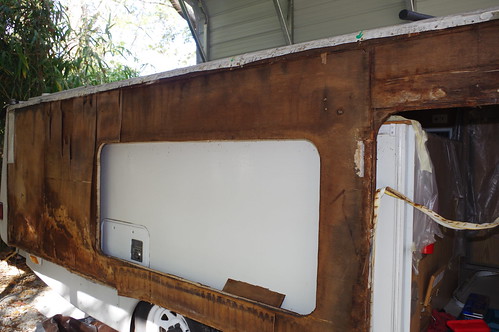
 IMGP3021 IMGP3021 by Lineswest, on Flickr
Looks like the wall is 4 thick from the seal that slides up and down the lower trailer wall to the outside edge of the steel beam. The slider should mount directly flush on that inner edge, with the only notch you need being the one in the sliding seal. I noticed the factory was a little carefree with how well that was done, so dont kill yourself trying to get the sliding seal perfect around the slider...
Now - the walls and liquid nails. I had mixed results with that too. I think you either need to use a PILE of it (which tended to melt some of the foam) or choose something else. To reattach all of the wall panels back together, I used a spade and this glue from Lowes called FRP panel adhesive. When i could I glued things together on the ground first with lots of different things used to keep weight on them while the glue set. When I couldnt ... well:
 IMGP3450 IMGP3450 by Lineswest, on Flickr
I did what I could.
let me look up the glue for you and Ill follow up this post.
__________________
--
2000 24' Classic, "We have the technology, we must rebuild it"
Also in the garage, some stuff to pull it:
1999 3/4 ton 'Burb
1993 Roadmaster wagon (well, it probably won't pull it)
|
|
|
|
|
03-24-2019, 03:44 PM
|
#129
|
|
Senior Member
Join Date: Jun 2016
Location: Ruston, LA
Posts: 272
|
Okay - here’s the glue I used, cleans up with water, nice stuff:
https://www.lowes.com/pd/titebond-gr...nts-128-fl-oz/
If you look at that second picture above, you can see I’ve cut new foam and that brownish stuff that is on it is this dried glue. I went back later and then cut the foam back to the right size for the window.
I also found these deep reach C-clamps very useful (from harbor freight):
https://www.harborfreight.com/12-inc...amp-45919.html
They can get you 12” in on a solid clamp from any opening you’ve got to work with. If you have a window to work with, you can get some decent reach. I also used some 1x4s or similar to distribute the clamp loads as best I could across a wall surface using a few c-clamps lined up along the boards (1 board on each side of the wall I was trying to get to “sandwich” back together).
I hope all that helps, keep at it. You’re in the thick of it, but you’ve started bringing it back into better shape already. Every step now improves it from the mess it used to be.
__________________
--
2000 24' Classic, "We have the technology, we must rebuild it"
Also in the garage, some stuff to pull it:
1999 3/4 ton 'Burb
1993 Roadmaster wagon (well, it probably won't pull it)
|
|
|
|
|
08-15-2020, 05:55 PM
|
#130
|
|
Senior Member
Join Date: Jul 2011
Location: Marietta, OH
Posts: 102
|
I need to replace parts of the wall and beam under the front window of my 23 ft. 2007 Classic due to water damage. Your rebuild thread and pictures are invaluable to my planning and preparation. Could you answer a question ... is the wooden beam on the inside of the wall attached to the square metal tube frame and if so how?
__________________
camperD
2307C and 2010 Tundra 5.7L Double Cab
Marietta, OH
|
|
|
|
|
08-15-2020, 08:29 PM
|
#131
|
|
Senior Member
Join Date: Jun 2016
Location: Ruston, LA
Posts: 272
|
Hi Camper
The beam is attached to the metal frame but it is actually constructed of a couple of different boards, one on top then the other on the bottom with a gap between. This view let’s you zoom into the replacement beam I built as well as the piece of the original that is still there by the door
https://flic.kr/p/Pud1Nm
There are a few other photos of the beam area in that general vicinity of the Flickr album. The lower beam is held to the metal frame by some good size lag bolts in a few spots.
Over the years, HiLo switched out the wood for what I believe are metal beams but with the same basic construction technique. I’m assuming you’ve got wood though since you’re wanting to replace it. Can you upload a picture of the area? There are a couple of other threads here that are very helpful for below the window areas specifically.
Keep us posted, ask plenty of questions. I’m happy to help as much as possible.
__________________
--
2000 24' Classic, "We have the technology, we must rebuild it"
Also in the garage, some stuff to pull it:
1999 3/4 ton 'Burb
1993 Roadmaster wagon (well, it probably won't pull it)
|
|
|
|
|
08-16-2020, 09:40 AM
|
#132
|
|
Member
Join Date: Mar 2018
Location: Illinois
Posts: 39
|
A 2200 rebuild
My 2200 needed a rebuild on the long side. 4 layers of treated 1/2" plywood were overlapped, glued & screwed to make a stiff 18 ft (or so) beam. A recess was left in the top of the beam for the wiring harness so I could get to it by removing the inside trim wood after final assembly. Factory assembly used long sheet metal screws with the head in the wooden beam. Rebuild used stainless deck screws with the head recessed in the steel beam. I will have to do the door side before too long.
|
|
|
|
|
10-02-2023, 09:21 PM
|
#133
|
|
Member
Join Date: Aug 2023
Location: Washington
Posts: 7
|
What would you have done differently?
I've read through this entire thread as I find myself in the same place. My wife purchased a 1985 Classic that appeared to be in decent shape, but needing a little TLC to get into shape. As we peeled away a few layers, it became clear that there was extensive water damage to the walls in the rear half of the trailer, the ceiling and under most of the windows. I also found that the 3/4" pressure treated plywood floor is compromised in many places.
I believe I am facing a 'y' in the road, and I'm looking for advice on how to proceed. I've done major rebuilds (houses) in the past, so the work ahead doesn't bother me (mantra here is 'I am in no rush').
The choice that I feel like I'm facing is:
1. Do I continue to peel back the onion one layer at a time and try to salvage what I can, or
2. Do cut the onion down to the frame and start re-building from there?
The first option could save some money, but is more risky and will take longer.
The second option is more expensive, but I won't have to worry about what is lurking in the untouched areas.
Thoughts?
|
|
|
|
|
10-02-2023, 10:04 PM
|
#134
|
|
Member
Join Date: Mar 2018
Location: Illinois
Posts: 39
|
Do you have a maximum damage limit where you would not do the repair / rebuild ? How much more damage do your expect to find? If you go ahead, I'd think about dedicating space in a garage or outbuilding for the duration of the project. My upper half front & long side took a four or five months to complete & sounds like you have an even bigger job.
I would do the lower half 1st and pay close attention to dimensions so the 2 halves will mate when you are done. I had alot of rusted out 1" steel tubing in my top half that I cut out & welded in replacements.
If your ceiling damage resulted from roof damage, you will be repairing stuff I didn't need to do. Others at this forum have replaced roofs.
|
|
|
|
|
10-02-2023, 11:19 PM
|
#135
|
|
Member
Join Date: Aug 2023
Location: Washington
Posts: 7
|
Quote:
Originally Posted by On The Road Again
Do you have a maximum damage limit where you would not do the repair / rebuild ? How much more damage do your expect to find?
|
I don't think we have a limit where we'd just scrap the trailer, and I'm mentally assuming most of the walls will need some sort of repair. I've not done a trailer rebuild, so I am concerned about the un-anticipated cost. The trailer has aluminum siding that I think I can salvage, but I've no idea how it's bonded to the metal frame. I'm also wondering the condition of the metal frame.
|
|
|
|
|
10-03-2023, 08:46 AM
|
#136
|
|
Senior Member
Join Date: Jun 2016
Location: Ruston, LA
Posts: 272
|
Quote:
Originally Posted by dledgerwood
I don't think we have a limit where we'd just scrap the trailer, and I'm mentally assuming most of the walls will need some sort of repair. I've not done a trailer rebuild, so I am concerned about the un-anticipated cost. The trailer has aluminum siding that I think I can salvage, but I've no idea how it's bonded to the metal frame. I'm also wondering the condition of the metal frame.
|
Hi there, it seems like you're faced with the prospects of a real project. One thing to think about is time, and as mentioned, space. If you don't "need" it right now and can work along at it when you can and as you can then it's the sort of thing that you can get done. The majority of the rebuild I did on my 2000 took a year. That was redoing some of the structure as needed, walls and roof.
Materials aren't free, but it's the time that can be a killer. It's a hobby that becomes a job at times.
The second year found me doing odds and ends to "finish" on a much slower pace. But new drapes were up, things were repainted, I spent time working on some of the sealing and then finally running gear to bring it fully "back."
I've also been able to work under a carport which was a major help. Even if it was misting or something, I could keep going if I had a free weekend. Top up or top down, it didn't matter. It has also kept the UV off of the trailer since then too so I'm hopeful the roof continues to hold form and function well.
So if you have the time and space, you're not losing much by pealing it back to go for it. These are neat trailers, and special in their way.
__________________
--
2000 24' Classic, "We have the technology, we must rebuild it"
Also in the garage, some stuff to pull it:
1999 3/4 ton 'Burb
1993 Roadmaster wagon (well, it probably won't pull it)
|
|
|
|
|
10-03-2023, 09:49 AM
|
#137
|
|
Senior Member
Join Date: Oct 2017
Location: cobbo
Posts: 239
|
My first thought while reading a few sentences in is, and I hate to say it, is to run. Just stop. I have done repairs, major repairs on one, ceiling and walls water damage. It is a lot of work and not really worth it unless you have nothing but time.
Nothing like working on a house. House work only gets you familiar with the tools and the products. Working on campers compared to house is way way harder. You cant just slap a 2x4 up and cover it with sheetrock, everything is needy and you must be precise and make exact cuts on curved 3-d surfaces, everything takes a lot longer. The concept is straight-forward, but the execution is not.
You will be getting into rusty metal on this one, so can you weld? Can you TIG weld? MIG welding wont cut it, you need TIG.
You are getting close to cold weather time. How warm will it be where you are? When it is time to put it back together you will be glueing everything, so need warm temps for the glue to cure or you are wasting your time.
So, honestly, dont try to make it perfect. It does not have to be perfect to be useable and last for years. Make sure all the wet wood is removed though.
One issue might be the thin aluminum roof now has tiny pin holes in it. This might be where the water got in. Hard to fix and harder to keep fixed. When you remove the ceiling you will see all the pin holes when the sun shines through.
These are cool campers and great for towing, but might not be worth messing with. And you always have the threat of one of the cables breaking and when that happens you are stuck, so plan to replace all cables while you are in there too.
__________________
1997 22L
Renovation complete!
|
|
|
|
|
10-03-2023, 11:42 AM
|
#138
|
|
Member
Join Date: Aug 2023
Location: Washington
Posts: 7
|
Quote:
Originally Posted by r67northern
you're not losing much by pealing it back to go for it. These are neat trailers, and special in their way.
|
Thanks for this info. Luckily, we have no need of it now, and the wife and I agree that there is a long road ahead of us.
In your rebuild, did you have an aluminum outer skin, or something else? If aluminum, did you try to salvage it or change to fiberglass? Understanding this will have a huge impact on how to begin the tear down.
|
|
|
|
|
10-03-2023, 12:06 PM
|
#139
|
|
Member
Join Date: Aug 2023
Location: Washington
Posts: 7
|
Quote:
Originally Posted by marininn
My first thought while reading a few sentences in is, and I hate to say it, is to run. Just stop. I have done repairs, major repairs on one, ceiling and walls water damage. It is a lot of work and not really worth it unless you have nothing but time.
|
Yeah...I thought about this as well; however, my wife is excited about the prospect and loves the Hi-Los. I'm preparing her, mentally/emotionally, for what she is asking.
Quote:
Originally Posted by marininn
Nothing like working on a house. House work only gets you familiar with the tools and the products. Working on campers compared to house is way way harder. You cant just slap a 2x4 up and cover it with sheetrock, everything is needy and you must be precise and make exact cuts on curved 3-d surfaces, everything takes a lot longer. The concept is straight-forward, but the execution is not.
|
I figured as much. I've rebuilt boats as well, so I'm somewhat confident I can extend those lessons learned to this project. For the welding, I'll have to trade a BBQ dinner with one of my friends to have them do that for me.
Quote:
Originally Posted by marininn
You are getting close to cold weather time. How warm will it be where you are? When it is time to put it back together you will be glueing everything, so need warm temps for the glue to cure or you are wasting your time.
|
We're planning this piece out. We have a dry place to store it over the winter, during which we would tear it down. As the weather warms, the glueing would begin.
Quote:
Originally Posted by marininn
One issue might be the thin aluminum roof now has tiny pin holes in it. This might be where the water got in. Hard to fix and harder to keep fixed. When you remove the ceiling you will see all the pin holes when the sun shines through.
|
The aluminum shell is the big wildcard for me. Not sure if it is better to salvage or replace with a fiberglass material. Salvaging means taking care during the tear down. Replacing means extra cost. What would you recommend?
The other concern I have is how to relaminate everything. I've done vaccuum bagging on small parts, but nothing on this scale. I'm not even sure HOW the seal could be made.
Long and short...I'm going to learn new skills through this process. I don't have to live in it, and we don't have a rush to use it anytime soon, so time is on our side.
|
|
|
|
|
10-03-2023, 01:28 PM
|
#140
|
|
Senior Member
Join Date: Oct 2017
Location: cobbo
Posts: 239
|
The roof could just be covered with EDPM rubber material, I would go that route.
I have only seen fiberglass panels on the siding, not aluminum. Salvage the fiberglass as it will not have been damaged by water. You will be scraping off glued ply-wood pieces from it though.
I left the outer panels in place and worked from the inside as I did not have to do the entire camper, just a section. The hard part of glueing is putting pressure to the walls from both sides.
DOnt use foamboard glue, that is less effective than bubble gum. New Liquid nails will not dissolve foamboards, but do a test check on any glue. I have also use paint for glue, Glidden Gripper is effective at glueing foam, not the strongest glue, but it works for many situations.
I ended up just screwing through the wall into boards in order to pull the wall together while it cures, then remove the screw and repair that damage. By then I was so over working on the camper so didnt care about a few screw holes.
Where the door is my camper top sagged bc there is not enough support. I had to weld and make a structure to hold the top from folding at the door.
Still time to run away. Spend your time camping and not working on a camper. That's my advice. Buy a camper that needs some work and do some work to it but dont make it a lifestyle and a burden. run away.
Im sure my adventures are posted on this forum somewhere too....
__________________
__________________
1997 22L
Renovation complete!
|
|
|
|
|
|
| Thread Tools |
Search this Thread |
|
|
|
| Display Modes |
 Linear Mode Linear Mode
|
 Posting Rules
|
You may not post new threads
You may not post replies
You may not post attachments
You may not edit your posts
HTML code is Off
|
|
|
|
 » Recent Threads
 |
|
|
|
|
|
|
|
|
|
|
|
|
|
|
|
|
|
|
|
|
|
|
|
|
|
|
|
|
|
|
|
|
|
|
|
|
|


