 |
|
 11-29-2016, 05:17 PM
|
#21
|
|
Senior Member
Join Date: Jun 2016
Location: Ruston, LA
Posts: 273
|
Thanks for the lubrication recommendations all. Always appreciate the help.
__________________
__________________
--
2000 24' Classic, "We have the technology, we must rebuild it"
Also in the garage, some stuff to pull it:
1999 3/4 ton 'Burb
1993 Roadmaster wagon (well, it probably won't pull it)
|

|

|
|
12-09-2016, 11:56 PM
|
#22
|
|
Member
Join Date: Apr 2010
Posts: 3
|
I am so glad that I checked this site tonight. For 4 years I've dreaded the repair of my HI-LO 2405 with several broken roof bows that allow the roof to bounce during travel. I made temporary wooden bows for reinforcement and then lost the motivation to finish. After seeing your pictures I realize mine could be much worse. Misery loves company. Thanks for the inspiration.
__________________
|
|
|
|
|
12-10-2016, 07:58 PM
|
#23
|
|
Senior Member
Join Date: Jun 2016
Location: Ruston, LA
Posts: 273
|
Quote:
Originally Posted by Loren Worthy

I am so glad that I checked this site tonight. For 4 years I've dreaded the repair of my HI-LO 2405 with several broken roof bows that allow the roof to bounce during travel. I made temporary wooden bows for reinforcement and then lost the motivation to finish. After seeing your pictures I realize mine could be much worse. Misery loves company. Thanks for the inspiration.
|
Company on one of these journeys is always good 
I find that it isn't too overwhelming if I don't think about the scope, but just take one step at a time. Today some interior roof came out, what a mess. I'll try and post a few pictures in the next day or two.
__________________
--
2000 24' Classic, "We have the technology, we must rebuild it"
Also in the garage, some stuff to pull it:
1999 3/4 ton 'Burb
1993 Roadmaster wagon (well, it probably won't pull it)
|
|
|
|
|
12-13-2016, 03:39 PM
|
#24
|
|
Senior Member
Join Date: Jun 2016
Location: Ruston, LA
Posts: 273
|
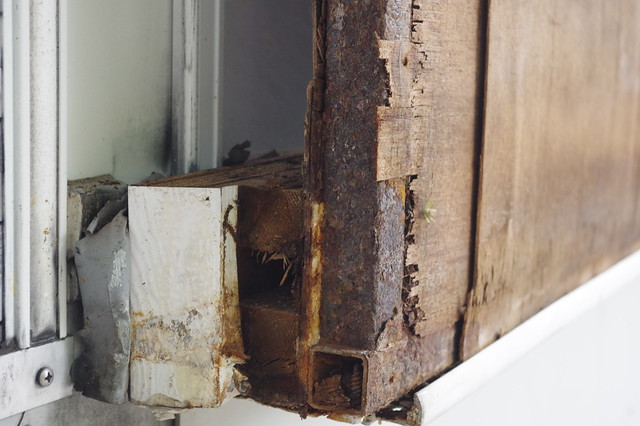
Hi Folks, a couple of pics and a question.
I've been taking down some of the interior ceiling, you can see the composite layers:
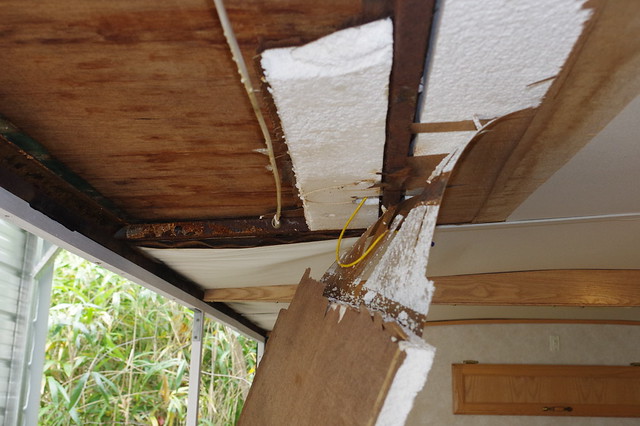 IMGP3229 IMGP3229 by Lineswest, on Flickr
In a few places it's easy to see how the aluminum roof skin failed. Looking up from below, the new polymer coating that was spread on top of it has leaked through the holes:
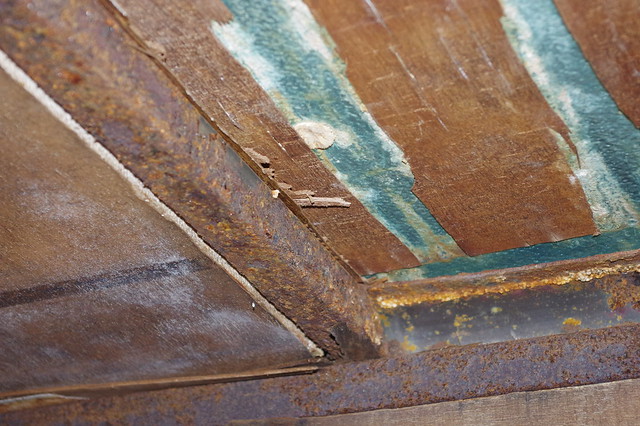 IMGP3226 IMGP3226 by Lineswest, on Flickr
My thought right now is to cut the aluminum skin off where it has delaminated and come away from the interior ceiling (probably about the first 2-3 feet from the wall side to the center, along the length of the trailer).
Then I can build the ceiling back up from the inside, finally laying some new aluminum sheeting down on top. Or galvanized sheeting? That would be a material mis-match with the remaining aluminum roof though so ...
Thoughts or recommendations? What gauge do you think might be appropriate? Always appreciate the input.
-Leland
__________________
--
2000 24' Classic, "We have the technology, we must rebuild it"
Also in the garage, some stuff to pull it:
1999 3/4 ton 'Burb
1993 Roadmaster wagon (well, it probably won't pull it)
|
|
|
|
|
12-13-2016, 09:36 PM
|
#25
|
|
Senior Member
Join Date: Mar 2010
Location: Niagara Falls,NY
Posts: 4,069
|
 Roof repair
We haven't had to repair our rubber roof inside or outside. When we tore our interior walls apart we treated the rusty metal with rustoleum paint. This way you won't get any bleeding into your new material. Do a search for posts by Garyk52 as he rebuilt his entire trailer including the interior and exterior roof. Maybe youtube would have a video that would help you.
|
|
|
|
|
12-14-2016, 06:46 AM
|
#26
|
|
Site Team
Join Date: Feb 2015
Location: SWFL Bonita Springs/Andrews, NC
Posts: 1,264
|
r67, I've been thinking of replacing my rubber roof because it seems to be loose in places. After seeing a couple of roof replacements, I'm sure I (and a couple of friends!) could complete the job in one day. As an previous owner of a 24' 2000 Classic, I feel a prudent idea would be to replace the tired old aluminum roof with a completely new rubber roof in your case. This way, even the plywood is replaced and the peace of mind goes a long way. Trying to add new metal, even aluminum, will cause galvanic corrosion (dissimilar metals) including the fasteners used, more problems later. Just my 2 cents.
Tree
__________________
Treeclimber
2703 Tow Lite
2002 Escalade
Bonita Springs, Fl. &
Andrews, NC
|
|
|
|
|
12-14-2016, 06:59 PM
|
#27
|
|
Senior Member
Join Date: Jun 2016
Location: Ruston, LA
Posts: 273
|
Thanks for the inputs. It's got me a little perplexed because it started life as a normal aluminum roof, then got coated with rubber polymer roof to seal up the holes. So it's a combo.
I had the thought of replacing the entire thing, not just the delaminated part ... but ... the rest of it is stuck down really well! So I'm leaning toward just going after the delaminated sections and leaving the rest. But I'm still thinking about it and appreciate the inputs.
__________________
--
2000 24' Classic, "We have the technology, we must rebuild it"
Also in the garage, some stuff to pull it:
1999 3/4 ton 'Burb
1993 Roadmaster wagon (well, it probably won't pull it)
|
|
|
|
|
12-14-2016, 09:26 PM
|
#28
|
|
Senior Member
Join Date: Mar 2010
Location: Niagara Falls,NY
Posts: 4,069
|
Roof replacement
I agree with treeclimber. The rubber roof is the way to go. Use your time over this long cold snowy winter to research the application/cost. I think someone that is an engineer on this forum replaced his roof with a rubber one. It totally eliminates the dissimilar metal issue.
|
|
|
|
|
12-15-2016, 06:45 AM
|
#29
|
|
Senior Member
Join Date: Jun 2016
Location: Ruston, LA
Posts: 273
|
Thanks Sam and Tree - I see what you're saying now. It's a northern Louisiana winter so I can push along on this thing little by little. Apart from the difficulty of actually yanking the aluminum roof off the paces where the glue is holding (about 2/3 of the trailer) I guess the other would be making sure the rounded roof edge in the sides as well as the end caps are smoothed and prepped well so they don't tear the rubber.
So I think... the plan would be
- pull old aluminum
- rebuild ceiling as needed
- relay new smooth plywood top layer
- get walls back in and finished up
- get the rubber roof down and sealed.
__________________
--
2000 24' Classic, "We have the technology, we must rebuild it"
Also in the garage, some stuff to pull it:
1999 3/4 ton 'Burb
1993 Roadmaster wagon (well, it probably won't pull it)
|
|
|
|
|
12-15-2016, 07:11 AM
|
#30
|
|
Site Team
Join Date: Feb 2015
Location: SWFL Bonita Springs/Andrews, NC
Posts: 1,264
|
r67, amazon has the complete reroof kit for $574.89. You'll complete the plywood, seal the joints with Gorilla tape, smoothing down all areas and screw heads, then apply the roofing according to instructions. UNDER the front cap and OVER the rear cap. install hardware and caulk the entire roof. As I noted, I'd have several friends helping out as needed, even if you gotta feed 'em. Better to have one extra helper than one helper short.
Tree
__________________
Treeclimber
2703 Tow Lite
2002 Escalade
Bonita Springs, Fl. &
Andrews, NC
|
|
|
|
|
12-15-2016, 07:18 AM
|
#31
|
|
Site Team
Join Date: Feb 2015
Location: SWFL Bonita Springs/Andrews, NC
Posts: 1,264
|
Oh, forgot. Several great youtube videos on this subject. Dicor 40 mil, 32' was the kit I quoted, see if they have one closer to your needs. Don't know what shipping charges for non-prime orders are. 40 mill is the preferred thickness, and most work is done without all those people ON the roof. Research first! Ensure of your space and capabilities and like most tasks, take your time.
Tree
__________________
Treeclimber
2703 Tow Lite
2002 Escalade
Bonita Springs, Fl. &
Andrews, NC
|
|
|
|
|
12-15-2016, 12:41 PM
|
#32
|
|
Senior Member
Join Date: Jun 2016
Location: Ruston, LA
Posts: 273
|
Quote:
Originally Posted by Treeclimber
r67, amazon has the complete reroof kit for $574.89. You'll complete the plywood, seal the joints with Gorilla tape, smoothing down all areas and screw heads, then apply the roofing according to instructions. UNDER the front cap and OVER the rear cap. install hardware and caulk the entire roof. As I noted, I'd have several friends helping out as needed, even if you gotta feed 'em. Better to have one extra helper than one helper short.
Tree
|
You bet - food for all. Why the 'over' the back and 'under' the front cap? Is the assembly different there? I can't recall.
__________________
--
2000 24' Classic, "We have the technology, we must rebuild it"
Also in the garage, some stuff to pull it:
1999 3/4 ton 'Burb
1993 Roadmaster wagon (well, it probably won't pull it)
|
|
|
|
|
12-15-2016, 01:27 PM
|
#33
|
|
Site Team
Join Date: Feb 2015
Location: SWFL Bonita Springs/Andrews, NC
Posts: 1,264
|
When installed under the front cap, the wind and rain blows over that sealed joint, not under the membrane (Think even a pin hole). And the same weather will go over the end cap and not under that either. Of course both ends are caulked. This kit includes the caulk, several tubes designed for rubber roof installs. I also liked the reviews and know Dicor products, which are used on high end boats (Yachts, I think they're called). If these products can withstand 15 yrs of Florida weather, then it will do well on our Hi Los.
Tree
__________________
Treeclimber
2703 Tow Lite
2002 Escalade
Bonita Springs, Fl. &
Andrews, NC
|
|
|
|
|
12-16-2016, 08:35 AM
|
#34
|
|
Senior Member
Join Date: Jun 2016
Location: Ruston, LA
Posts: 273
|
Thanks Tree - I see what you're saying. I was up on the roof a bit and it looks like the rubber compound they spread all over it when it was 'fixed' years back may be showing some discoloration that is coming through from the aluminum below. That's a good reason to get the whole thing gone.
Too bad that rubber compound is so hard - it isn't going to make getting to bolts and screws easy around all of those skylights and vents. I guess that's what dremel tools are for, eh?
__________________
--
2000 24' Classic, "We have the technology, we must rebuild it"
Also in the garage, some stuff to pull it:
1999 3/4 ton 'Burb
1993 Roadmaster wagon (well, it probably won't pull it)
|
|
|
|
|
12-16-2016, 09:15 PM
|
#35
|
|
Senior Member
Join Date: Mar 2010
Location: Niagara Falls,NY
Posts: 4,069
|
Tools for rebuild
Don't know if a heat gun would help. Maybe,PB Blaster. We found a multi tool very helpful. When we did our HiLo rehab DH got to buy a few new tools..drool.
|
|
|
|
|
12-17-2016, 06:39 AM
|
#36
|
|
Senior Member
Join Date: Jun 2016
Location: Ruston, LA
Posts: 273
|
Heat gun is a good idea, thanks.
__________________
--
2000 24' Classic, "We have the technology, we must rebuild it"
Also in the garage, some stuff to pull it:
1999 3/4 ton 'Burb
1993 Roadmaster wagon (well, it probably won't pull it)
|
|
|
|
|
12-17-2016, 06:51 AM
|
#37
|
|
Site Team
Join Date: Feb 2015
Location: SWFL Bonita Springs/Andrews, NC
Posts: 1,264
|
r67, When removing the fixtures from the roof, vents, A/C etc, I use a razor knife, a hard plastic blade about 1" wide sharpened, and a 1 1/2" putty knife, then I just take my time and remove the sealant around each screw, then remove the screws. Then, with care, I pry up the vent with the putty knife, cutting the sealant with the razor as it rises. I get into trouble if I hurry.
Tree
__________________
Treeclimber
2703 Tow Lite
2002 Escalade
Bonita Springs, Fl. &
Andrews, NC
|
|
|
|
|
12-17-2016, 12:49 PM
|
#38
|
|
Senior Member
Join Date: Jun 2016
Location: Ruston, LA
Posts: 273
|
Well, based on the time stamps of these messages, I think we get up too early
Those are all appreciated inputs (and I haven't had to buy too many new tools yet - I've been expanding my set over the past few years because of things like my old automotive fleet - see below - but I AM collecting a nice set of stainless screws).
I think I may work a bit on the wall given the decision to pull the entire roof and replace it. I am thinking that getting new rubber glued down and placed on the roof is the last step, with the final trim and sealing pieces going after that. If the walls aren't back up and ready for the final seals, it would be tough to keep the rubber roof held in place.
At least that's my Saturday afternoon thought.
__________________
--
2000 24' Classic, "We have the technology, we must rebuild it"
Also in the garage, some stuff to pull it:
1999 3/4 ton 'Burb
1993 Roadmaster wagon (well, it probably won't pull it)
|
|
|
|
|
01-02-2017, 09:09 AM
|
#39
|
|
Senior Member
Join Date: Jun 2016
Location: Ruston, LA
Posts: 273
|
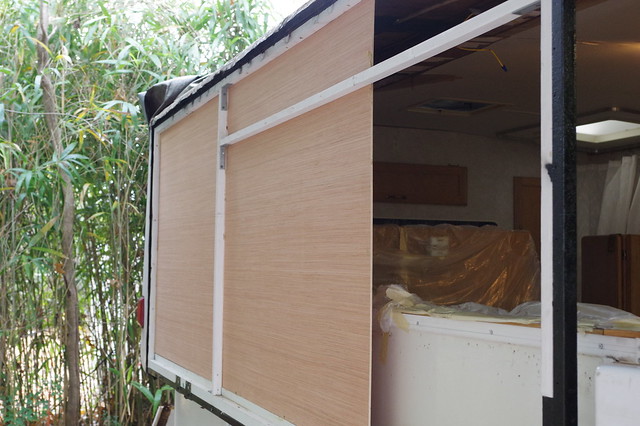
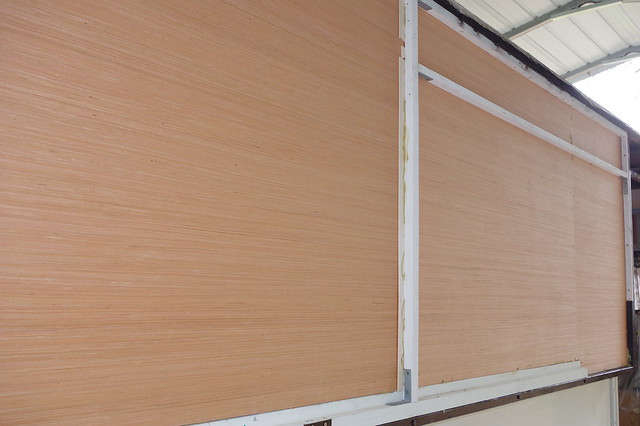
Update with a few photos:
I've made some progress with the rear 2/3 wall that was ripped out. Here are a few photos with the extruded polystyrene (XPS) foam in place:
 IMGP3275 IMGP3275 by Lineswest, on Flickr
 IMGP3276 IMGP3276 by Lineswest, on Flickr
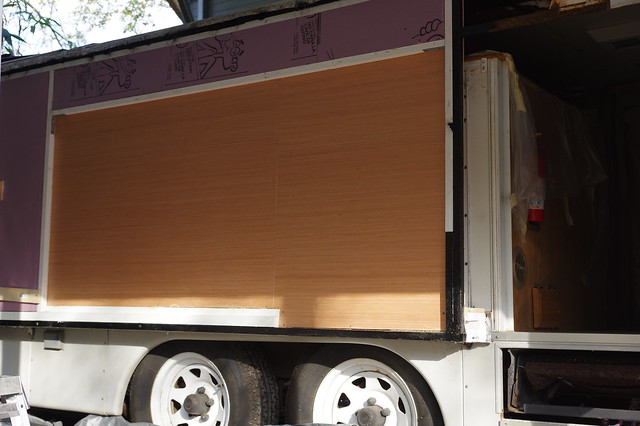 IMGP3280 IMGP3280 by Lineswest, on Flickr
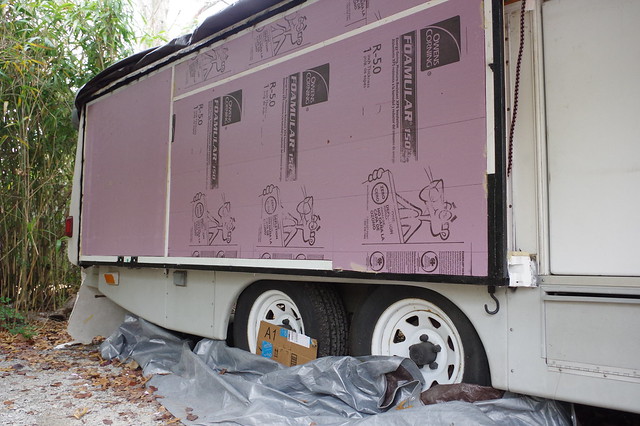 IMGP3373 IMGP3373 by Lineswest, on Flickr
Prepping the fiberglass shell for repaint (with anti-mold primer) and then reattachment to a 2.5mm board. When all together, it will be the outer 5mm shell ready to go back on the new foam wall. Looks pretty all painted up.
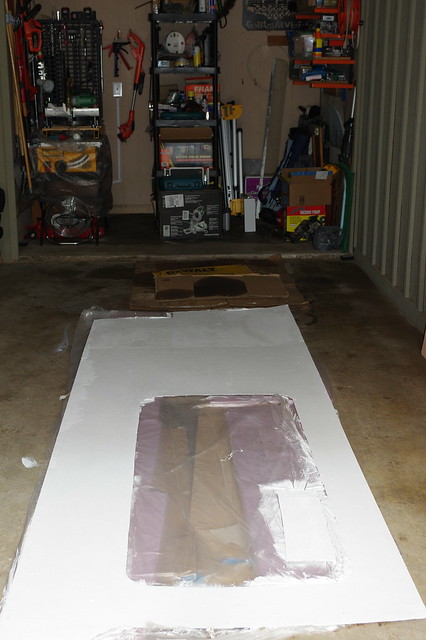 IMGP3386 IMGP3386 by Lineswest, on Flickr
Now re-prepping it because the liquid nails didn't hold well. Used some 'Tite Bond' adhesive for fiberglass board instead
https://www.lowes.com/pd/Titebond-TB...hesive/3227253
and let it sit under the Suburban with weight all over it for a couple days (not the suburban's weight), seems to be much better adhered now.
 IMGP3398 IMGP3398 by Lineswest, on Flickr
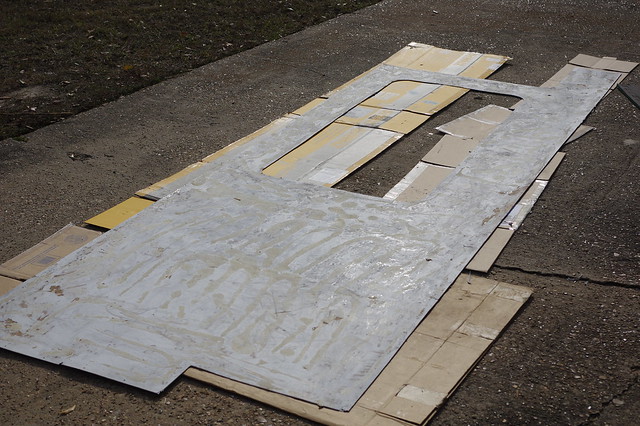
Now ready to roll on the front 1/3 ... and try and get that rear fiberglass back up.
 IMGP3394 IMGP3394 by Lineswest, on Flickr
The rebuilder of walls seemed a nice touch:
 IMGP3402 IMGP3402 by Lineswest, on Flickr
Happy new year everyone.
-Leland
__________________
--
2000 24' Classic, "We have the technology, we must rebuild it"
Also in the garage, some stuff to pull it:
1999 3/4 ton 'Burb
1993 Roadmaster wagon (well, it probably won't pull it)
|
|
|
|
|
01-02-2017, 07:14 PM
|
#40
|
|
Senior Member
Join Date: Mar 2010
Location: Niagara Falls,NY
Posts: 4,069
|
Good pictures
Good to get an update. Gives us cold sometimes snowy northerners something to do over the long winter. Glad you found a glue that worked for you. DH used Heavy Duty Liquid Nails from Walmart in our restoration. Cheapest at Walmart. Another forum member used 4oz of Gorilla glue and two tubes of HD liquid nails on his ceiling/roof rebuild. Use a very generous amt. of glue/ect on each panel.Something like one to two tubes on each paneling in big S swirls. Best of luck as your repairs continue. You should be camping by spring time.
__________________
|
|
|
|
|
|
 Posting Rules
|
You may not post new threads
You may not post replies
You may not post attachments
You may not edit your posts
HTML code is Off
|
|
|
|
 » Recent Threads
 |
|
|
|
|
|
|
|
|
|
|
|
|
|
|
|
|
|
|
|
|
|
|
|
|
|
|
|
|
|
|
|
|
|
|
|
|
|


 Linear Mode

