 |
|
 10-23-2011, 10:19 AM
|
#1
|
|
Member
Join Date: Oct 2011
Location: PA & WY
Posts: 12
|
 1990 Hi-Lo Guide Block, Shower repair, bottom of top side replacement
Need some advice before I start my repairs. Bought a 1990 Hi-Lo 22' for my princess, Great condition, everything works, new rubber roof, $3700. Get home and I'm looking over every last little thing now that it's ours! Find loose screws on glide block. Further investigation, wood is rotted behind Glide block. Find the source of the leak coming from the Shower. Further investigation would show that it may be time to just replace the whole bottom runner on the top side. I'm considering this because the staples on Aluminum flashing have rusted through the flashing and I also need new bulb seal all the way around, I am posting pics for your pleasure!
__________________
|

|

|
|
10-23-2011, 10:22 AM
|
#2
|
|
Member
Join Date: Oct 2011
Location: PA & WY
Posts: 12
|
Outside area of Damage
Outside area of damage on left rear
__________________
|
|
|
|
|
10-23-2011, 10:24 AM
|
#3
|
|
Member
Join Date: Oct 2011
Location: PA & WY
Posts: 12
|
Glide Block rot on bottom of top side
This is where the Glide Block used to be.
|
|
|
|
|
10-23-2011, 10:27 AM
|
#4
|
|
Member
Join Date: Oct 2011
Location: PA & WY
Posts: 12
|
Glide Block rot on bottom of top side
You can see all the original staples have rusted through the aluminum flashing. The wood behind is soft and plyable.
|
|
|
|
|
10-23-2011, 10:30 AM
|
#5
|
|
Member
Join Date: Oct 2011
Location: PA & WY
Posts: 12
|
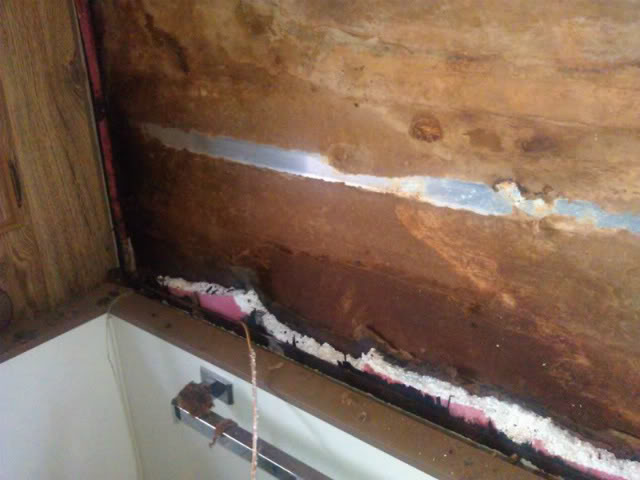
Cable Mount Pulling into Bottom of Top side.
Here you can see the cable pulling through the aluminum flashing and into the wood. Of everything that is great about Hi-Lo's, this particular part of the lift design is less than stellar. I intend to replace all of these with stainless steel right angle brackets to distribute the pressure of the cable across a wider section of the future new bottom of the top side.
|
|
|
|
|
10-23-2011, 10:36 AM
|
#6
|
|
Member
Join Date: Oct 2011
Location: PA & WY
Posts: 12
|
Inside area of problem
This is the inside of the shower looking at the top of the rotted wood..... which is the "bottom of the top side" member you saw in the glide block photos. This seems to be 2 sheets of 1/2" sheets of pressed wood glued together.
|
|
|
|
|
10-23-2011, 10:40 AM
|
#7
|
|
Member
Join Date: Oct 2011
Location: PA & WY
Posts: 12
|
Inside area of problem 2
Closer shot, the "Bottom of the Top Side" member is seperating from the laminate and the 1/8" wood sheet. It appears that the "Bottom of the top side" member is on top of everything in the wall. If so I assume this all Glued to the laminate?
|
|
|
|
|
10-23-2011, 10:47 AM
|
#8
|
|
Member
Join Date: Oct 2011
Location: PA & WY
Posts: 12
|
last two pics of rot
Any suggestions would be helpful. I work construction but, I'm electrician by trade. Still, I can do this. I can't add the subwoofer and TV till I do. LOL.
If you have done this before, Can you help me?
Thanks
MD and MS
|
|
|
|
|
10-23-2011, 10:59 AM
|
#9
|
|
Senior Member
Join Date: Jan 2011
Posts: 109
|
You need to tear the wall apart, there is more damage in there than you can see!
|
|
|
|
|
10-23-2011, 02:42 PM
|
#10
|
|
Senior Member
Join Date: Jun 2011
Location: SLC Utah
Posts: 294
|
There are people on this forum that have done similar repairs and I am sure they will give you some advice. I am interested in their comments to the right angle brackets as I have a similar issue.
I am glad we took the advice to not use the shower/tub.
|
|
|
|
|
10-23-2011, 02:59 PM
|
#11
|
|
Senior Member
Join Date: Jun 2010
Location: Nebraska
Posts: 129
|
We use our tub/shower in both of our hi-lo's all the time and have used them since the day we bought them. I have never had ANY issues with water damage. The shower curtains that come with the units are in my opinion NOT waterproof. I put two soft plastic shower curtains together all the way around and then have the curtains that come with the units on the outside. My walls are just like new NO soft stops NO mold. I think alot of people use the curtains that come with the hi-lo and that's why the water damage happens.
__________________
Nebraska
2004 31ft Classic Hi-Lo (Hubby & I)
1996 26ft RD Classic Hi-Lo (Our children & grandkids borrow from us) 1996-to present
|
|
|
|
|
10-23-2011, 03:16 PM
|
#12
|
|
Member
Join Date: Oct 2011
Location: PA & WY
Posts: 12
|
Agreed, after an all day deliberation with my roofing neighbor we have come to a best idea for repair of the "bottom of the top side". this wood member needs replaced on both sides of our 1990 Hi-Lo. We intend to remove the flashing underneath, and then start at the rot area and scrape out the rot till we see were the member is fastened to the wall. Our biggest problem here is the "bottom of the top side" member screws into the wall from the inside out. I believe if we can saw-zaw the screws, then we can demo and remove the "bottom of the top side". I am a circuit junkie so I am now thinking of future service calls here.... for this we would intend to fasten a new "bottom of the top side" member from the outside in with rubber seal stainless steel roofing type screws. This would put the screw heads on the outside of the fiberglass, however a well done job would look nice all in a straight line going down the side of the camper. This would allow us to also remove the "bottom of the top side" in the future to future replace any bulb seals.
The only other way I can see to replace this "bottom of the top side" would be to jack the top half the Hi-lo up and off all together. Now we are talking about removing all the electric wiring and such.
Does anyone have any suggestions on this modification "outside in fasteners" that we intend to do?
Does anyone half a rough idea of the weight of the top half? I figure 600lbs with removal of cabinets.
Thanks, MD
|
|
|
|
|
10-23-2011, 03:23 PM
|
#13
|
|
Member
Join Date: Oct 2011
Location: PA & WY
Posts: 12
|
Quote:
Originally Posted by Rolff

There are people on this forum that have done similar repairs and I am sure they will give you some advice. I am interested in their comments to the right angle brackets as I have a similar issue.
I am glad we took the advice to not use the shower/tub.
|
I can't wait to use ours! Just simple neglect happened here, and maybe kids that didn't know better. Otherwise a nice plastic curtain should do the trick for keeping water in the tub.
|
|
|
|
|
10-23-2011, 03:59 PM
|
#14
|
|
Senior Member
Join Date: Jun 2011
Location: SLC Utah
Posts: 294
|
There must be a dozen people on this forum that only use their tubs for storage, many because of water damage. Some have even removed the tub completely. The main reason we don't use ours because my wife is 5' 9" and I am 6' 2". Good luck with your repairs.
|
|
|
|
|
10-23-2011, 04:09 PM
|
#15
|
|
Member
Join Date: Oct 2011
Location: PA & WY
Posts: 12
|
I understand, we are 6'1". It's not easy! Thanks for the good luck, will need it.
|
|
|
|
|
10-23-2011, 06:23 PM
|
#16
|
|
Senior Member
Join Date: Jul 2010
Location: Greensburg, PA
Posts: 345
|
We use ours all of the time as well, I am 6'1 and my wife is 5'11. YOu can pop the top by cutting 2x's and proping them under the top half and using the leveling jack to push it off. I would start at level, drop the tongue jack 2" and cut the 2x's to fit near the cable attachment at the rear. Set them in place and run the jack up after disconnecting the cables. Once the top passes the top rail and you can incert another 2x across the walls of the lower half incert them and move the 2x jacks to the front and lower the tongue jack until you can slip another 2x across the walls. If the bottom rail of the top is rotted to the point that you can't lay something across the walls you could probably leave it on the 2x jacks, but I would shore it up some how. You may be able to place something inside against the ceiling. Be sure to disconnect the vent stack and you can probably disconnect the 12v from the fuse box and pull it up through the wardrobe, that's prosuming that it's in the same place as my 93.
__________________
2016 Toyota tacoma TRD sport
Classic 2693 RD
Luke 1:49
|
|
|
|
|
10-23-2011, 11:50 PM
|
#17
|
|
Senior Member
Join Date: Mar 2010
Location: Niagara Falls,NY
Posts: 4,070
|
Repair iof 90 HiLo
See my posts in Off topic oof our 90 Classic HiLo..The underlay is 1'8 thick plywood. Then we are going to use 1/8 Georgia Pacific plywood with one side vinyl. Our HiLo dealer told us where in our area to get the 1/8 underlay/had to get the lumber co. to order it in. The Paneling was ordered from our local ACE hardware store. We plan on using Liquid Nails on the underlay. Cut your paneling then apply Liquid nails in an S pattern .Squish the underlay to the wall and then remove the underlay and let the wall tack up and reapply. We will use a brad nailer as needed. I read that you could use stainless upholstery nals/staples as they won't rust. We used a multi Tool with two different bladfes to cut and get under the underlay. We are leaving the styrofoam in place. Don't agree with hubby on this. Extremely important to take out all the windows,remove old caulk ect and reseal with two layers of butyl tape. Use Lexell caulk on outside of window to reseal exterior. Lexell caulk can be bought at ACE Hardware for $8.oo a tube. Well worth the price. Many of us have had to do major repairs. I am very confident that you can do the necessary repairs. We still have a little more ripout to do. Today hubby was able to use a small dowel rod and new lag screws to reattach the awning bracket. Take the time to cut and fit cardboard over all your floor surfaces Tape with duct tape. Use the gray tape heating duct tape to cover any pin holes. I found some "Duck" brand tape with elastomeric in it at Walmart. Most important to put Lexell caulk on the outside tophalf(at the bottom just above the trim).Hope this helps.
|
|
|
|
|
10-24-2011, 12:04 AM
|
#18
|
|
Senior Member
Join Date: Mar 2010
Location: Niagara Falls,NY
Posts: 4,070
|
HiLo repairs
We did jack up our HiLo and place 2x4 at each corner to support it. This gave me an extra four inches of exposed wall. I am still removing with locking forcepts wet underlay/paneling. Replacing any of the screws with stainless steel is a good investment. Take pictures as your work progresses.
|
|
|
|
|
10-24-2011, 12:22 AM
|
#19
|
|
Senior Member
Join Date: Mar 2010
Location: Niagara Falls,NY
Posts: 4,070
|
90 fix uper
I was told by someone that worked at a HiLo dealership that there was a lot of trouble with the lamination process in the 90's. This could explain the shower rot. We shower at the State campsite bathouse. The showers are hot and it doesn't burn our propane and put wear and tear on the hot water tank. We put a piece of interior/exterior-refinished across ourbathtub. This gives some storage in the bathtub. Lots of storage on top of the plywood. We got a special plumbing piece to cut off the bathtub water from our HiLo dealer. I believe it is installed under the trailer. We kept bumping the bathtub water on. You can shower anywhere with a set of flipflops.
|
|
|
|
|
10-26-2011, 09:28 PM
|
#20
|
|
Member
Join Date: Nov 2010
Location: N CENTRAL PA
Posts: 76
|
i like that idea. i always used the shower for storing my luggage anyways.
i must add i am sorry the Hi-Lo has a couple problems. i did not know about any of this. i was just so happy to have a nice "new" hi-lo at the time, i just took it out and enjoyed it. the dealer implied it was all good and ready to go so that what i did. it all worked well and performed as it should.
i was proud to show it off. its a real nice unit.
it had no issues that i was aware of so i didn't go lookin for any 
i hope this is all fixable and it will be ready for camping soon.
Joan
__________________
1984 Fun Chaser - past
1990 Fun Chaser - past
1995 Cobra RV - present
|
|
|
|
|
|
 Posting Rules
|
You may not post new threads
You may not post replies
You may not post attachments
You may not edit your posts
HTML code is Off
|
|
|
|
 » Recent Threads
 |
|
|
|
|
|
|
|
|
|
|
|
|
|
|
|
|
|
|
|
|
|
|
|
|
|
|
|
|
|
|
|
|
|
|
|
|
|


 Linear Mode

