 |
|
 01-28-2017, 05:36 PM
|
#41
|
|
Senior Member
Join Date: Jun 2016
Location: Ruston, LA
Posts: 273
|
Working along on this as I can, got the sides more or less back on it, starting the fight with windows and doors now. Here are a few pics, enjoy:
[IMG] 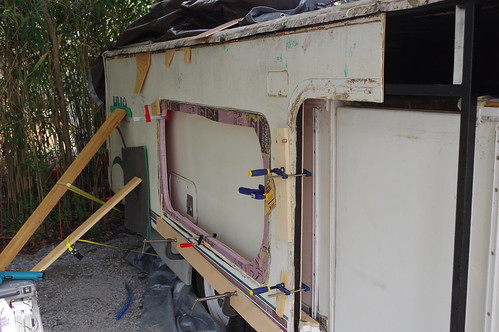 IMGP3438 IMGP3438 by Lineswest, on Flickr[/IMG]
Front third removed and sanded / painted:
 IMGP3439 IMGP3439 by Lineswest, on Flickr
Framing up:
[IMG] 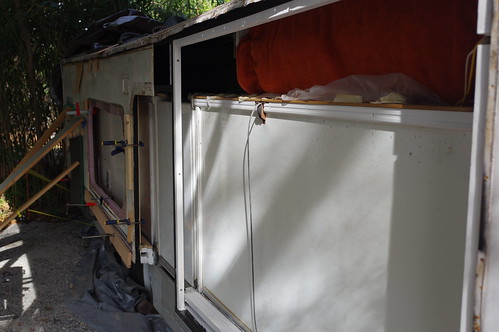 IMGP3440 IMGP3440 by Lineswest, on Flickr[/IMG]
... and lacking a real vacuum system to assemble the "Fully Laminated Durable Construction" that came from the factory, I put some tie-downs to work with lots of liquid nails:
 IMGP3450 IMGP3450 by Lineswest, on Flickr
Almost ...
 IMGP3453 IMGP3453 by Lineswest, on Flickr
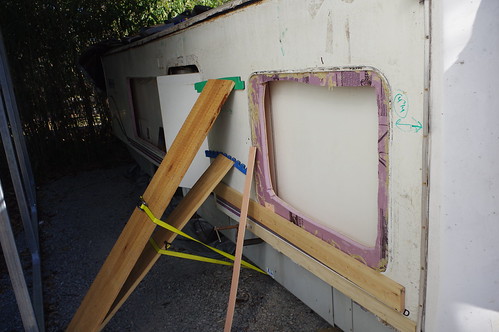
One down, still needs the caulk on the outside after a day or two of letting the butyl tape squeeze. I also cleaned up the side, looks pretty nice - not perfect but also not rotten any more 
 IMGP3455 IMGP3455 by Lineswest, on Flickr
__________________
--
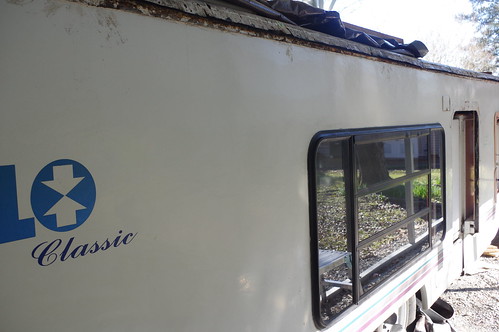
2000 24' Classic, "We have the technology, we must rebuild it"
Also in the garage, some stuff to pull it:
1999 3/4 ton 'Burb
1993 Roadmaster wagon (well, it probably won't pull it)
|

|

|
|
01-28-2017, 08:53 PM
|
#42
|
|
Senior Member
Join Date: Mar 2011
Location: Riverside County, CA
Posts: 691
|
Shaping up nicely, keep it up and you will have a new Hi-Lo
__________________
__________________
Fantastic Wife 
2005 Toyota Tundra V-8 4.7L
2705T Tow Lite
1999 21T Tow Lite
|
|
|
|
|
01-28-2017, 10:34 PM
|
#43
|
|
Site Team
Join Date: Jul 2010
Location: Pine, AZ
Posts: 4,549
|
That looks darned good, sir! Well done!
- Jack
|
|
|
|
|
01-29-2017, 12:43 AM
|
#44
|
|
Senior Member
Join Date: Mar 2010
Location: Niagara Falls,NY
Posts: 4,072
|
 Rebuild
I also concur that it is coming along nicely. You should be ready for spring time camping.
|
|
|
|
|
01-31-2017, 09:48 AM
|
#45
|
|
Senior Member
Join Date: Jun 2016
Location: Ruston, LA
Posts: 273
|
Thanks everyone for the encouragement. I know that the roof itself is looming, and there are a couple of soft spots on the opposite wall. At least the wall won't need a total tear down though.
As for the roof, I've been leaning toward the method suggested by a couple of others of just starting over with a membrane roof. I had a thought about another option though ... could be a bad option ... can a fiberglass panel like what's on the siding be used for a roof? Lowes sells these FRPs in white, and there are also straight plastic panels there like what gets used on the inside of commercial car wash bays.
I'm thinking the caveats could be UV resistance? Cracking?
Any thoughts appreciated.
-Leland
__________________
--
2000 24' Classic, "We have the technology, we must rebuild it"
Also in the garage, some stuff to pull it:
1999 3/4 ton 'Burb
1993 Roadmaster wagon (well, it probably won't pull it)
|
|
|
|
|
01-31-2017, 12:00 PM
|
#46
|
|
Site Team
Join Date: Jul 2010
Location: Pine, AZ
Posts: 4,549
|
Those are interesting questions, r67! You could easily provide UV resistance by coating the roof with almost ANY paint, but I'd lean toward the white elastomeric stuff. It's flexible and is designed for roofs. You can find it in Home Depot, Lowes, ACE, etc.
I think the possibility of cracking is a more serious consideration. But, fiberglass can be reinforced at screw attachment points. Again, painting with white elastomeric would reduce the thermal load from the sun significantly, so you'd have fairly minimal expansion problems. Possibly, if the screw holes were drilled somewhat oversized and you used washers or wide top screws, there wouldn't be too much stress at those points.
I think I'd stay away from plastic. I wonder how corrugated metal roofing would work? The stuff I used for my trailer carport is not very heavy. It comes in 10x4 ft panels that bend easily along the long axis to follow any "hump" in the roof. It's galvanized and already painted and can be attached with rubber washered screws to prevent water penetration at those points. There WOULD be a problem at the ends, since there would be openings under the panels there, but I suspect there's a solution.
- Jack
|
|
|
|
|
01-31-2017, 04:19 PM
|
#47
|
|
Senior Member
Join Date: Jun 2016
Location: Ruston, LA
Posts: 273
|
Very interesting idea Jack. More stuff to ponder on.
Much appreciated
-Leland
Quote:
Originally Posted by JackandJanet

Those are interesting questions, r67! You could easily provide UV resistance by coating the roof with almost ANY paint, but I'd lean toward the white elastomeric stuff. It's flexible and is designed for roofs. You can find it in Home Depot, Lowes, ACE, etc.
I think the possibility of cracking is a more serious consideration. But, fiberglass can be reinforced at screw attachment points. Again, painting with white elastomeric would reduce the thermal load from the sun significantly, so you'd have fairly minimal expansion problems. Possibly, if the screw holes were drilled somewhat oversized and you used washers or wide top screws, there wouldn't be too much stress at those points.
I think I'd stay away from plastic. I wonder how corrugated metal roofing would work? The stuff I used for my trailer carport is not very heavy. It comes in 10x4 ft panels that bend easily along the long axis to follow any "hump" in the roof. It's galvanized and already painted and can be attached with rubber washered screws to prevent water penetration at those points. There WOULD be a problem at the ends, since there would be openings under the panels there, but I suspect there's a solution.
- Jack
|
__________________
--
2000 24' Classic, "We have the technology, we must rebuild it"
Also in the garage, some stuff to pull it:
1999 3/4 ton 'Burb
1993 Roadmaster wagon (well, it probably won't pull it)
|
|
|
|
|
01-31-2017, 10:01 PM
|
#48
|
|
Senior Member
Join Date: Mar 2010
Location: Niagara Falls,NY
Posts: 4,072
|
Roof ideas
Search the internet for what others have used to re roof. I would be afraid to do anything but a tried and true method. You don't want to do all the work to the rest of the HiLo and then have leaks. You might be able to wait to do the other soft spot wall. It can be a chalenge when so much work is needed.
|
|
|
|
|
02-01-2017, 03:43 PM
|
#49
|
|
Senior Member
Join Date: Jun 2016
Location: Ruston, LA
Posts: 273
|
Quote:
Originally Posted by sam
Search the internet for what others have used to re roof. I would be afraid to do anything but a tried and true method. You don't want to do all the work to the rest of the HiLo and then have leaks. You might be able to wait to do the other soft spot wall. It can be a chalenge when so much work is needed.
|
That's a good point too Sam, thanks. I can probably let a majority of the other wall wait, some of the rot is from window leaks so those will need to be dealt with but the goal is not a whole lot more than that.
When I get the old roof off, I'll probably have a better idea of how things look too.
And your comment on "tried and true" is right. It has occured to me that I've taken care of what I considered to be a critical strength and stability problem in the wall ... but I have done nothing to address the problems that caused it in the first place!
__________________
--
2000 24' Classic, "We have the technology, we must rebuild it"
Also in the garage, some stuff to pull it:
1999 3/4 ton 'Burb
1993 Roadmaster wagon (well, it probably won't pull it)
|
|
|
|
|
03-02-2017, 05:45 PM
|
#50
|
|
Senior Member
Join Date: Jun 2016
Location: Ruston, LA
Posts: 273
|
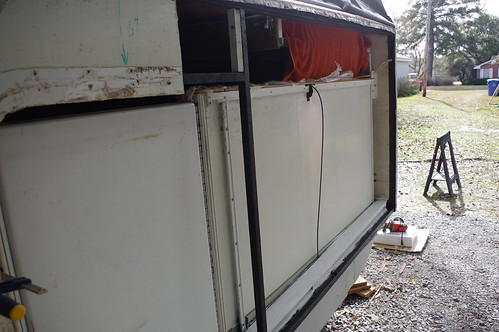
A quick update from 24' Classic land (I noticed that someone recently listed a 2000 24' Classic for sale that was in excellent shape ... needless to say it wasn't me )
Here's the door back in place:
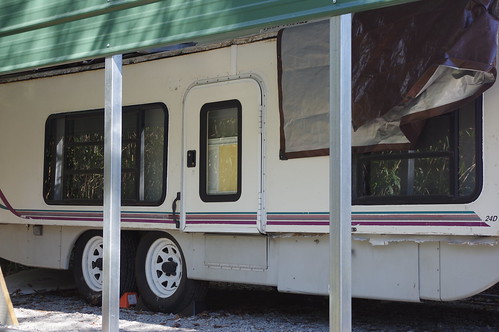 IMGP3458 IMGP3458 by Lineswest, on Flickr
And now the 7.4L goes to work shuttling the trailer around the carport a bit. The roof comes off next so having access to both sides seemed like a good idea:
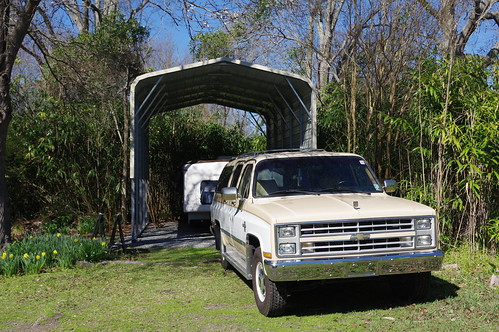 IMGP3457 IMGP3457 by Lineswest, on Flickr
And now ... the roof and decking comes off:
 IMGP3489 IMGP3489 by Lineswest, on Flickr
What a mess. Good thing I started with the sides, the roof feels really daunting but the metal beams are brushed and painted in the rear 2/3s. The front 1/3 comes next after I rebuild this decking, then I'll work down the other side.
I did uncover the failure mode for the original aluminum roof. Buried under the rubberized coating that was smeared all over it as a bandaid were holes and holes and more holes. It was leaking like a sieve from many, many locations.
__________________
--
2000 24' Classic, "We have the technology, we must rebuild it"
Also in the garage, some stuff to pull it:
1999 3/4 ton 'Burb
1993 Roadmaster wagon (well, it probably won't pull it)
|
|
|
|
|
03-02-2017, 06:53 PM
|
#51
|
|
Site Team
Join Date: Feb 2015
Location: SWFL Bonita Springs/Andrews, NC
Posts: 1,264
|
r67, Great post! seeing it being done makes it easier for me to get started on my re-roof. As I said before, for the price of the complete kit, Dicor is the way to go. (this is my opine). We just sold our 2nd home here in Fla, and have moved to a Tiny Home (from 2,000sf to 900sf). So before starting my re-roof, I'll have to build my garage/shop. That'll take a month.
Have to say, while blowing out this house prior doing a complete reno, we lived in the Hi Lo for about three weeks. We truly enjoyed our 27' sanctuary.
Best of luck, my friend, and keep up the stellar job.
Tree
__________________
Treeclimber
2703 Tow Lite
2002 Escalade
Bonita Springs, Fl. &
Andrews, NC
|
|
|
|
|
03-05-2017, 08:49 PM
|
#52
|
|
Senior Member
Join Date: Jun 2016
Location: Ruston, LA
Posts: 273
|
Quote:
Originally Posted by Treeclimber
r67, Great post! seeing it being done makes it easier for me to get started on my re-roof. As I said before, for the price of the complete kit, Dicor is the way to go. (this is my opine). We just sold our 2nd home here in Fla, and have moved to a Tiny Home (from 2,000sf to 900sf). So before starting my re-roof, I'll have to build my garage/shop. That'll take a month.
Have to say, while blowing out this house prior doing a complete reno, we lived in the Hi Lo for about three weeks. We truly enjoyed our 27' sanctuary.
Best of luck, my friend, and keep up the stellar job.
Tree
|
Thanks Tree - and good luck getting the garage/shop built up. That will make the project a lot easier I'm sure. I've been learning quite a bit about this aluminum roof and doing some thinking about the best options too. I really like the membrane option, but I've leaned away from it for now.
I'm about to post a few pictures of the roof decking come back together (below), see what you think. Especially where the metal "arc" wraps over between the top beams and the siding, it's really rough. There are weld joints that don't line up well, and general unevenness too. I've been concerned that they could be potential tear points so I've been looking into other options.
My plan right now is to experiment with peel and seal aluminum "tape."
MFM Peel & Seal® - Aluminum - Roofing Membranes 50036 : MFM Cart
It's been used a few times (if you believe the internet) on camper roofs and I like it's chances to roll over and adhere well to some of the surfaces that the HiLo folks left buried under the aluminum covering. I interacted briefly with one of their techs and he seemed to think this would be no problem for the product.
And of course, if it doesn't work, I'll let everyone know and you can all say "I told you so."
__________________
--
2000 24' Classic, "We have the technology, we must rebuild it"
Also in the garage, some stuff to pull it:
1999 3/4 ton 'Burb
1993 Roadmaster wagon (well, it probably won't pull it)
|
|
|
|
|
03-05-2017, 08:56 PM
|
#53
|
|
Senior Member
Join Date: Jun 2016
Location: Ruston, LA
Posts: 273
|
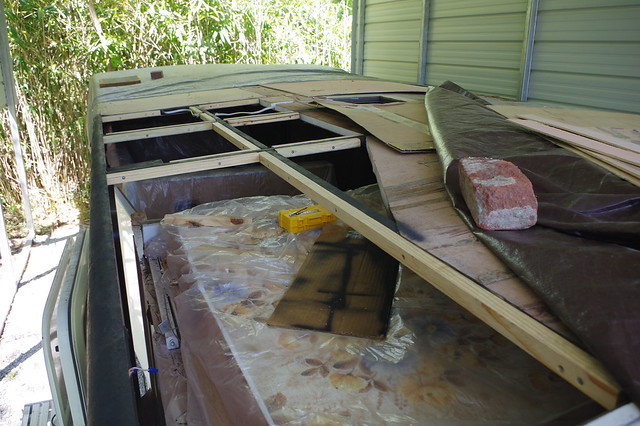
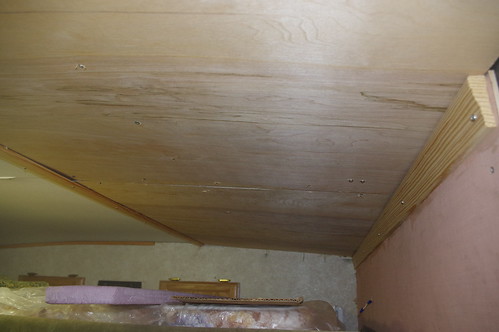
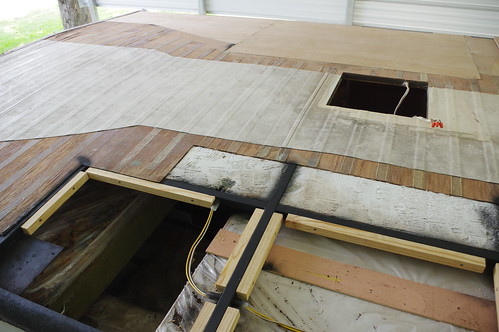
A few picks of the roof decking coming along:
Some ceiling is in place, and a new wood beam across the huge empty gap that was in the back bathroom area. HiLo originally had a thin aluminum strip running beneath their 1"foam to help strengthen this. I inserted the wooden beam into the remaining foam on one side, and then lofted it to the wall frame on the other.
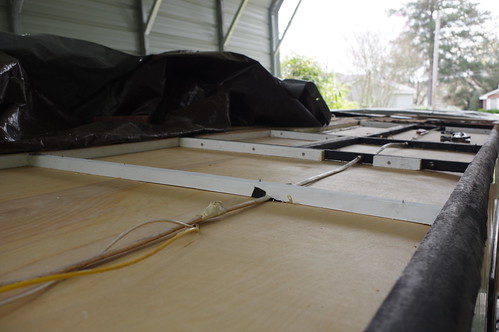 IMGP3491 IMGP3491 by Lineswest, on Flickr
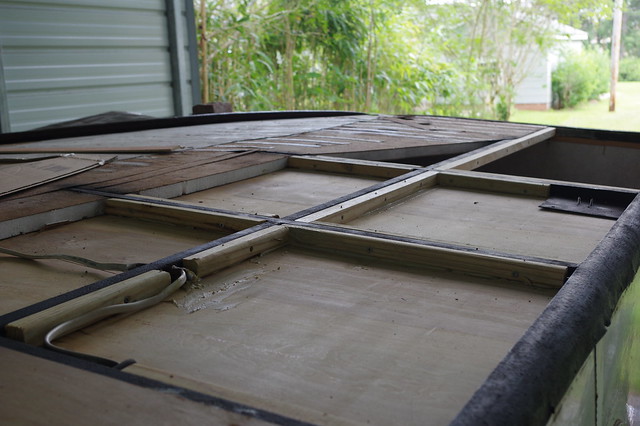
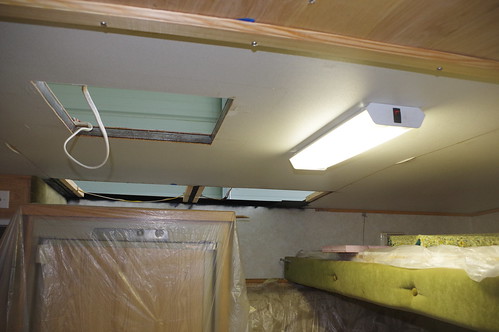
And the inside. Note the new ceiling trim pieces. I'll clean those up later, for now they're doing an important job.
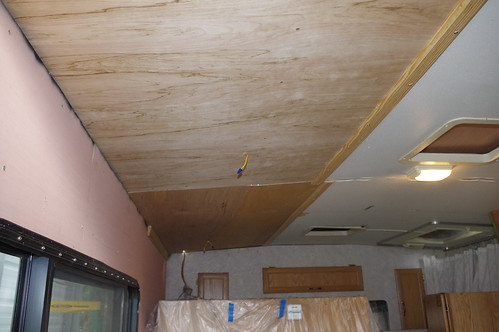 IMGP3492 IMGP3492 by Lineswest, on Flickr
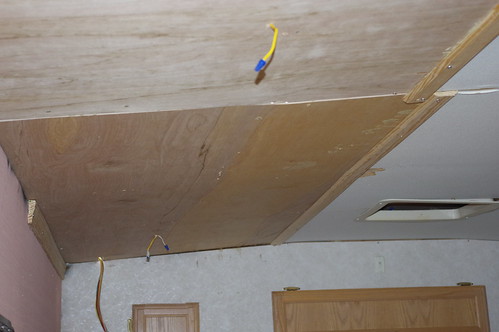 IMGP3493 IMGP3493 by Lineswest, on Flickr
Foam board in place:
 IMGP3496 IMGP3496 by Lineswest, on Flickr
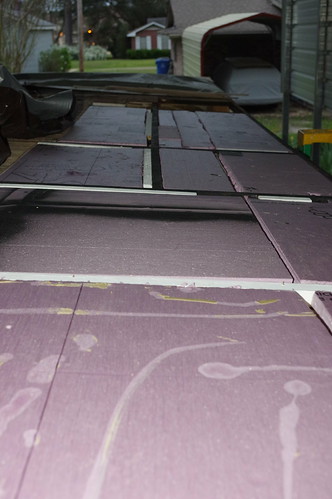
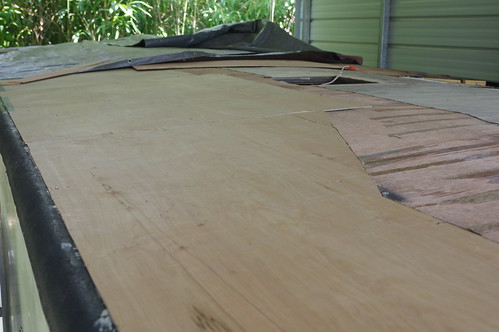
And top decking cut and sized. It laps over the original white foam about 3 inches on the center to help unify the old roof with the new roof:
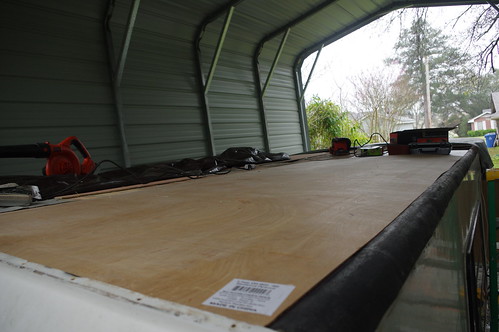 IMGP3499 IMGP3499 by Lineswest, on Flickr
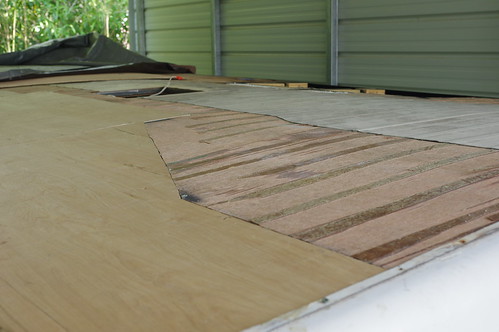
Here's one of the places where I wish HiLo had been a little more careful. The top wood is laying atop one of the metal beams ... which comes out of alignment to weld to the curve-over. This was all buried by the aluminum covering:
 IMGP3501 IMGP3501 by Lineswest, on Flickr
One last shot for now. Glue is the next step, hopefully sometime in the next week, then on to the front 1/3
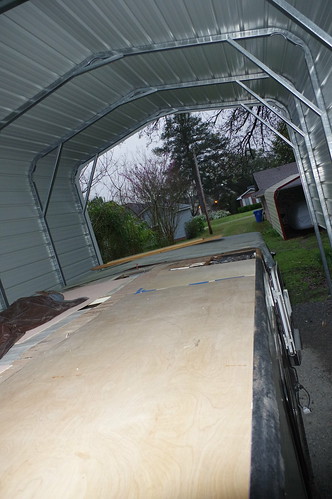 IMGP3503 IMGP3503 by Lineswest, on Flickr
__________________
--
2000 24' Classic, "We have the technology, we must rebuild it"
Also in the garage, some stuff to pull it:
1999 3/4 ton 'Burb
1993 Roadmaster wagon (well, it probably won't pull it)
|
|
|
|
|
03-05-2017, 11:36 PM
|
#54
|
|
Senior Member
Join Date: Mar 2010
Location: Niagara Falls,NY
Posts: 4,072
|
Roof replacement
You are doing a good job on the roof replacement and saving thousands of dollars. Another forum member used 4ounces of gorilla glue and 2tubes of heavy duty liquid nails per panel.
|
|
|
|
|
05-16-2017, 06:28 PM
|
#55
|
|
Senior Member
Join Date: Jun 2016
Location: Ruston, LA
Posts: 273
|
Well, it's been a while. Tough spring for doing repairs (job was taking a lot of time on the weekends) and then I got pretty sick and have been recovering and a bit slower because of that. But ... there was a little progress:
 IMGP3530 IMGP3530 by Lineswest, on Flickr
and a new board in place:
 IMGP3588 IMGP3588 by Lineswest, on Flickr
Hopefully things start moving along a bit better now.
__________________
--
2000 24' Classic, "We have the technology, we must rebuild it"
Also in the garage, some stuff to pull it:
1999 3/4 ton 'Burb
1993 Roadmaster wagon (well, it probably won't pull it)
|
|
|
|
|
05-27-2017, 05:04 PM
|
#56
|
|
Senior Member
Join Date: Jun 2016
Location: Ruston, LA
Posts: 273
|
A few update pics. Got the roof decking back together on the passenger side (door side), now I'm starting to work back down the driver side which, thankfully, isn't as heavily damaged.
Restored passenger side:
 IMGP3665 IMGP3665 by Lineswest, on Flickr
On the top, you can see I've left a "backbone" of the original aluminum roof in place for now. It's adding some strength as I wander around on the top.
 IMGP3669 IMGP3669 by Lineswest, on Flickr
 IMGP3670 IMGP3670 by Lineswest, on Flickr
A new "skylight" now on the driver side:
 IMGP3666 IMGP3666 by Lineswest, on Flickr
Painted and ready for new decking:
 IMGP3667 IMGP3667 by Lineswest, on Flickr
__________________
--
2000 24' Classic, "We have the technology, we must rebuild it"
Also in the garage, some stuff to pull it:
1999 3/4 ton 'Burb
1993 Roadmaster wagon (well, it probably won't pull it)
|
|
|
|
|
05-27-2017, 07:00 PM
|
#57
|
|
Senior Member
Join Date: Oct 2016
Location: ohio
Posts: 454
|
very extremely well done and looking very nice. great job and lots of hours in that! well done.
|
|
|
|
|
05-27-2017, 11:05 PM
|
#58
|
|
Senior Member
Join Date: Mar 2010
Location: Niagara Falls,NY
Posts: 4,072
|
Looking good
Looking real good. Better than factory. Lots of rain this spring. Before you know it you will be out camping.
|
|
|
|
|
05-28-2017, 10:16 AM
|
#59
|
|
Senior Member
Join Date: Jun 2016
Location: Ruston, LA
Posts: 273
|
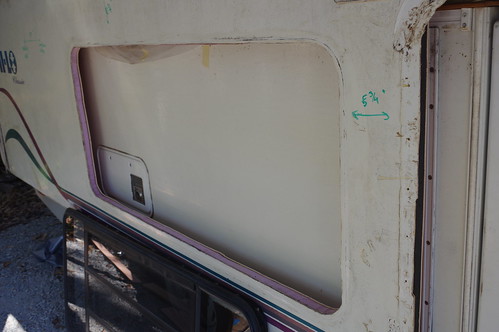
Thanks Sam and Maestro ... so here's a question for you all. The side of the trailer that I haven't fixed yet looks like this, you can see where I've highlighted the delaminated sections:
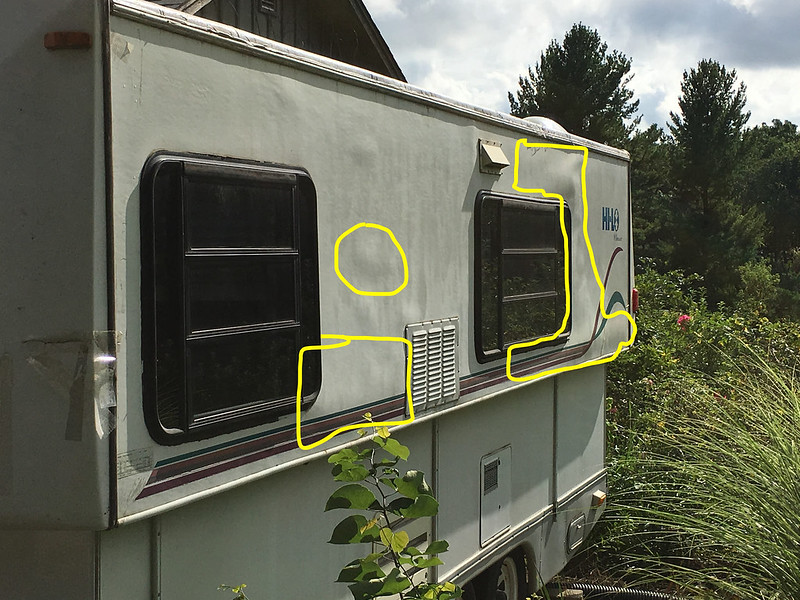 28864679621_e62df75a6e_k 28864679621_e62df75a6e_k by Lineswest, on Flickr
Unlike the door side, most of it is okay so pulling the whole thing off is silly (and probably hard). I'm trying to think of different ways to deal with this. I feel like I need a plan before I get the roof finished with new outer material though because it will wrap over the wall top and make any wall repair more difficult.
My thoughts so far:
1) don't do anything except reseal the windows (needs to be done anyway) and get as much glue back in those sections as I can with the windows out
2) Make cuts on the fiberglass outer to pull sections out for repair and rebuild those pieces like I did the door side wall. Maybe cover the "seams" that I'll be adding with some nice racing stripes?
3) other options?
Thanks for any ideas on this one.
__________________
--
2000 24' Classic, "We have the technology, we must rebuild it"
Also in the garage, some stuff to pull it:
1999 3/4 ton 'Burb
1993 Roadmaster wagon (well, it probably won't pull it)
|
|
|
|
|
05-28-2017, 08:34 PM
|
#60
|
|
Senior Member
Join Date: Mar 2010
Location: Niagara Falls,NY
Posts: 4,072
|
Delamination
Not an expert. Maybe with the window out you can see better the interior wall. Search the net for the right marine product that you could use. It might be possible to peel the exterior off and re glue.
__________________
|
|
|
|
|
|
 Posting Rules
|
You may not post new threads
You may not post replies
You may not post attachments
You may not edit your posts
HTML code is Off
|
|
|
|
 » Recent Threads
 |
|
|
|
|
|
|
|
|
|
|
|
|
|
|
|
|
|
|
|
|
|
|
|
|
|
|
|
|
|
|
|
|
|
|
|
|
|


 Linear Mode

